We've recently talked about how to perform a RAM upgrade on the Acer Aspire 5 A515-56-36UT. We seriously recommend you do that if you haven't already.
However, you're not limited to only upgrading the memory on this laptop, you can also upgrade the storage thanks to its 2.5-inch SATA bay. Today we're going to walk you through the process so you can see just how simple and easy this whole process is and you can be on your way to upgrading the storage on the Acer Aspire 5 A515-56-36UT.
Acer Aspire 5 A515-56-36UT Storage Upgrade Step-by-Step
First off, you should probably purchase the storage unit you're going to use. You've got a 2.5-inch SATA bay available so you can get either a 2.5 inch SSD or a 2.5-inch Hard Drive. We seriously advise against getting a hard drive, mainly because the read/write speeds are along the lines of the 100 MB/s whilst with a SATA SSD you're looking at read/write speeds of roughly 500 MB/s. There's a price difference but it's hardly enough to justify such a massive difference in performance.
You could also opt to replace the onboard storage. Specifically, the A515-56-36UT features a PCIe SSD NVME M.2 unit with a 128 GB capacity. This type of storage has the best read/write speeds with over 3000 MB/s, however, they aren't cheap alternatives and you would also need to migrate your data and OS to the new unit so for now, we'll just walk through the process of upgrading the bay.
Once you've got the storage unit, a screwdriver, and something to help you pry open the laptop you're ready to go ahead and start the process.
Step 1: Before taking any action on your laptop you need to make sure the laptop is turned off and disconnected from the power source. And when I say turned off I mean turned off, not hibernating. Once that's been confirmed go ahead and place the laptop upside down and remove all the screws attaching the lower case to the chassis. Now is when you're going to make use of the plastic pry I mentioned earlier to help you open up the case like so:

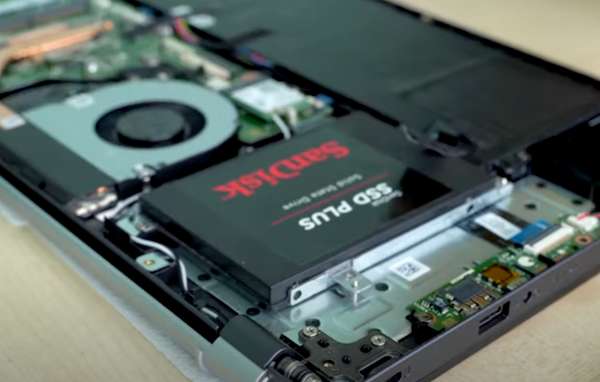
Step 2: Once that laptop has been opened and the internals exposed, you'll quickly be able to notice the 2.5-inch storage bay located on the upper-left side. You need to grab your screwdriver once again and remove the screws attaching the side of the bay to be able to properly insert the unit. But we're getting ahead of ourselves.

Step 3: You'll notice that the SATA connector is already in place. Now simply grab your storage unit and connect it to the SATA connector.

Step 5: Finally, now that you've inserted the storage unit you can close the lid of the laptop. Simply place it on top of the laptop, apply some pressure to attach it correctly, and re-introduce the screws you removed at the beginning of this tutorial. Now you're going to turn the laptop on and go to "Disk management" and you'll find that under "Disk 1" you've got a storage space that's "unallocated".
You need to right-click on it and click on the option "New Simple Volume", click "Next", introduce the amount of space you want the new volume to take as well as the letter you want to assign to it. Then you click next, leave the formatting at NTFS, change the name of the volume if you want to. After that, you're going to click "Next" and then Finish. And that's it. You've correctly managed to upgrade the storage on the Acer Aspire 5 A515-56-36UT. Easy, right?
