Nowadays, you can get a decent gaming laptop for under $1000. And while this price range is still quite hefty in absolute terms, it’s affordable enough to be within reach for many gamers who have been waiting for years to jump into PC games without being forced to choose between an ultra-portable or a powerhouse desktop.
However, given how much time and effort you put into customizing your rig before launch day arrives, it’s easy to feel like all of your work has gone down the drain if there’s not enough RAM onboard. Fortunately, though, most gaming laptops allow the user to upgrade the onboard memory. Such is the case with the Acer Nitro 5 AN517-54-79L1. And today that's exactly what we're going to walk you through in this Acer Nitro 5 AN517-54-79L1 RAM upgrade tutorial.
Acer Nitro 5 AN517-54-79L1 RAM Upgrade Step-by-Step
What Type of RAM do I Need? How much RAM can I upgrade to?
Now, in terms of the
amount of memory we can use, this laptop
takes up to 64 GB of memory,
32 GB of compatible RAM on each slot. Personally, though, I think that upgrading to the maximum amount is a bit of an overkill.
If you're an avid gamer, programmer, or you're going to use the laptop to edit videos and the likes, then
32 GB in total should suffice, and all you need to do here is get your hands on
two compatible 16 GB units of RAM.
It should be pointed out that it's best practice, when upgrading the memory on a laptop, to upgrade both sticks of RAM so that your laptop can still work with dual-channel RAM, otherwise you'll have more RAM but if it's not working in dual-channel mode you're not going to notice an increase in performance as you would if you had two identical RAM sticks.
How Do I Upgrade the Memory on the Acer Nitro 5 AN517-54-79L1?
To do this upgrade you're going to need a screwdriver and a device that you can use to pry open the laptop. You could use a guitar pick, for example, or another type of thin yet sturdy plastic device. You won't need much else as it's a pretty straightforward process.
Step 1: Before getting your screwdriver you need to make sure the laptop is turned off and disconnected from the power source. Once you're sure the laptop is turned off then place it upside down and remove all the screws located at the bottom of the laptop. After removing the screws simply grab your pry and start gently opening up the bottom case like so:
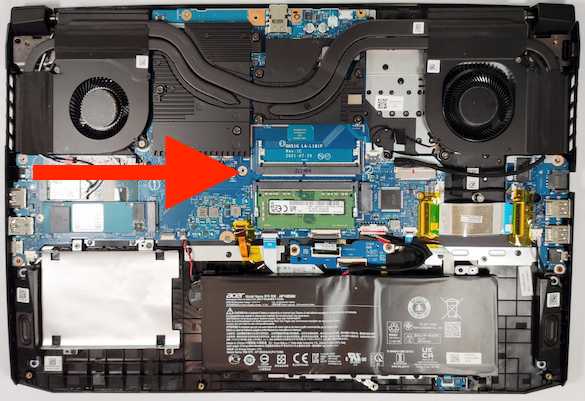
Step 2: Once you've removed the bottom case you're going to quickly see the RAM slots, located just above the battery. You'll notice that one of the RAM slots is taken by a single RAM module. You should replace it with the two RAM sticks you bought to have your laptop working perfectly with dual-channel RAM.

Step 3: To remove the onboard RAM simply pull outwards on the levers/clasps located on the sides of the memory slot. This will release the stick at a 45-degree angle, at which point you may remove it. This is an illustrative gif on how you pull the clasps outwards, though you can do it with your hands.
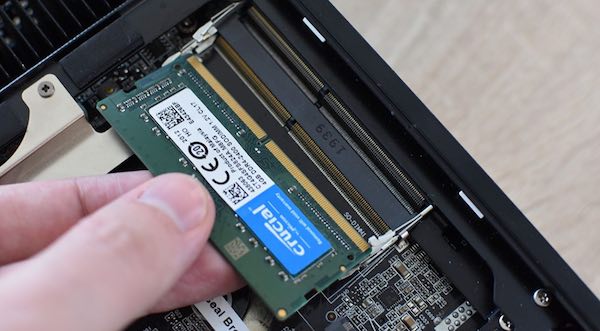
Step 4: Now that you've removed the onboard RAM you need to insert your own sticks of RAM at 45-degree angles. To do so correctly simply make sure that the notch on the slot and the notch on the module align like the image below. Once they're aligned, insert the RAM and press down. When you hear a clicking sound, that's the sound of the clasps clutching to the module.
Step 5: Finally, re-attach the case, screw it back onto the laptop, and turn it on. Under "Device Specifications" you should be able to see your new amount of memory.
As you can see, it's a pretty easy straightforward upgrade and now you can enjoy the benefits of multitasking to your heart's content, edit videos with blazing fast rendering speeds, and work with dozens of tabs open without the Acer Nitro 5 AN517-54-79L1 so much as breaking a sweat.


