If you're looking to speed up your laptop there are a few things you can do. However, one of the most efficient ways to speed up your laptop's performance is undoubtedly to upgrade the available RAM. Specifically, the more memory your laptop has, the more tasks it can manage at any given time, making it that much faster in the process.
Here at 9to5gadgets we've covered a wide array of RAM upgrades over the years. Today we're going to be talking about how to upgrade the memory on one of the most popular business laptops of the last decade; the Lenovo Thinkpad T590.
It's a fairly simple process and you should be able to do it in less than 5 minutes since it's not an elaborate process. Today we're going to walk you through it step by step.
How To Upgrade The RAM On The Lenovo ThinkPad T590
How Much RAM Can I Install? What Type Of RAM Module Do I Need?
Step By Step Upgrade Tutorial
Step 1: Before doing anything you need to make sure that the T590 is turned off, disconnected from the power supply and any accessories have been removed. Once that's done place the T590 on a flat surface and make sure you have both a Philips screwdriver and a non-metallic prying tool. We like to use a guitar pick to pry open laptops but whatever you use is up to you.

Step 2: Grab the screwdriver and remove all 8 screws attaching the bottom cover to the rest of the laptop.
Once you have removed all 8 screws you're going to go ahead and grab your prying tool which you will use to separate the bottom case from the body of the laptop like so.

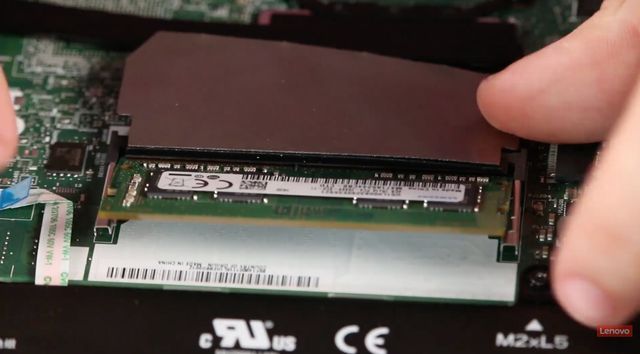
Step 3: When you have lifted the cover from the system you'll quickly notice the heat flap covering the RAM slot.

Step 4: Introduce the RAM module at a 45-degree angle, as if you where landing a plane. To make sure you're introducing the RAM correctly make sure that the notch on the RAM unit and the notch on the slot align perfectly like so:

Step 5: Press down on the module towards the board until you hear a "click" sound. That's the sound of the clutches on the side of the RAM slot clutching to the new RAM unit.
Step 6: Re-attach the cover to the system and place the 8 screws back where they where originally. Turn the laptop on and head over to "Device Specifications". There, under "Installed Memory" you should be able to see your new amount of RAM and confirm that you have successfully upgraded the RAM on the Lenovo Thinkpad T590.
And that's it! You have quickly and swiftly follows this tutorial and you should now have a much faster laptop. Enjoy!