We've talked in-depth about the Acer Aspire 5 A515-56-347N, an interesting laptop that boasts a 15.6-inch Full HD display, 8 GB of RAM, and a very modest 128 GB of storage for an extremely compelling price point. It's a great laptop that's well-suited for casual users who don't need massive storage or massive RAM because they're going to work on relatively basic tasks on it.
However, should the need arise, it's also possible to upgrade the storage on this laptop. Specifically today we're going to teach you how to upgrade the NVMe storage on the Acer Aspire 5 A515-56-347N. Much like the RAM upgrade that we covered earlier, it's a fairly simple procedure that shouldn't really take you much more than five minutes.
It's possible to also use a SATA III drive but for this tutorial, we're going to focus on the upgrade of the NVMe storage unit because this is the one that offers roughly 5 times the speed over the traditional SATA III and will have the biggest impact both in storage as well as actual performance.
Acer Aspire 5 A515-56-347N Storage Upgrade
Before you get all friendly with your screwdriver you need to know exactly the type of storage that's compatible with this particular laptop. In the case of the
A515-56-347N, it's a
NVMe M.2 PCIe. Particularly, prioritizing speed and efficiency we would recommend upgrading to either the
Samsung 970 EVO Plus of 500 GB or you could also go all out for the
Samsung 970 EVO Plus with 1 TB of capacity. Both options are relatively cheap and will provide you with a significant boost in performance.
Of course, when replacing the NVMe SSD module you'll need to have your data backed up. That goes without saying.
Acer Aspire 5 A515-56-347N SSD Replacement Step-by-step
To perform this you're going to need three things aside from the SSD drive you've already got in your possession. Specifically, you will need a screwdriver to remove the screws from the bottom case, a prying tool to help you open up the laptop, and a little bit of patience. Let's get cracking!
Step 1: Before you do anything make sure that laptop is turned off and disconnected from the power source. You'll also want to make sure that there are no peripherals connected to the notebook for the upgrade.
Once that's done place the laptop on its back and remove all the screws attaching the bottom case. Fortunately for you, they are all the same size so you don't need to go through the hassle of later remembering which screw went where.
Step 2: With the help of the prying tool, slide it through the sides of the laptop until you can safely and easily remove the bottom cover.
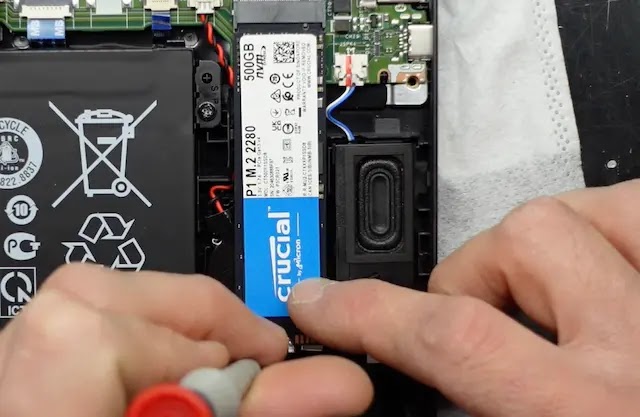
Step 3: You've finally exposed the internals of the laptop. The "hard part" is now done. You'll quickly notice the NVMe drive located on the side of the battery.
Step 4: Before swapping out the storage unit we would strongly urge you to disconnect the battery. To do so simply remove the tape attaching the cables and the pin and pull the connector outwards until you can see the golden pins.
Step 5: Now that you have successfully disconnected the battery, grab your screwdriver and remove the screw that's located on the end of the
NVMe storage unit. It's easy to spot because one side is connected to the port and the other is attached to the board by a simple screw.
Step 6: With the screw removed you can gently wiggle the drive out ot its place. Grab your new drive and introduce it in the slot. There's a small notch that will help you know if you're introducing the SSD correctly or if you should flip it over.
The NVMe drive will be in place once the golden pins are fully introduced within the slot. At which point you can screw it into place with the screw you removed from the previous drive.
Step 7: Re-attach the battery connector you removed previously. You'll notice a red line, when that red line is no longer visible in the white part of the connector that means that you've properly reconnected the battery.
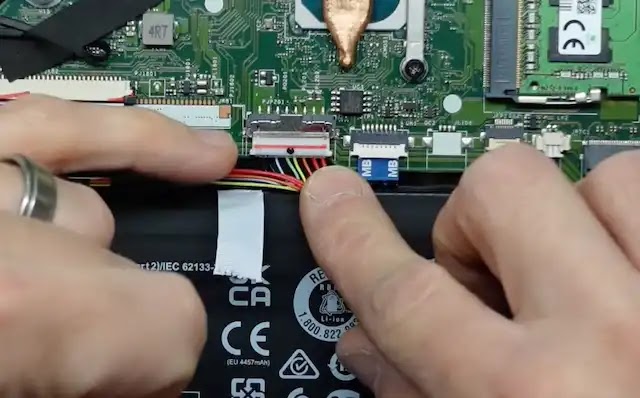 |
You need to no longer be able to see that red line.
|
And that's it! Re-attach the bottom case you removed during this tutorial and boot up your laptop. You'll need to re-install Windows as we've mentioned before but you'll be very very happy that you went through this upgrade. 128 GB is very little space once you also consider the space occupied by the operating system.
This upgrade will not only improve space but also provide a snappier performance since your drive won't be overloaded with data and will be able to work much faster taking full advantage of the Core i3 processor.


