We've already talked in-depth about the Lenovo Ideapad 3 81X800ENUS. We've mentioned that it's not really the best laptop the market has to offer and you could do better with numerous other options such as the ACEMAGIC AX15 with its 12th generation N95 processor, 16 GB of RAM, and 512 GB of storage.
However, the fact that it's not the best laptop Lenovo has to offer doesn't mean there aren't a few tweaks we could do to improve the overall performance. On that note, today we're going to walk you through the process of upgrading the RAM on the Lenovo Ideapad 3 81X800ENUS.
With a powerful processor, 256 GB of SSD storage, and a crisp 15-inch display, a RAM upgrade would definitely mark an improvement for this notebook in everyday performance. Without further ado, let's get on with this upgrade tutorial.
Lenovo Ideapad 3 81X800ENUS RAM Upgrade
What Type of RAM Do I Need? How Much Can I Install?
For this notebook, you're going to need to get your hands on a DDR4 PC4-21300 2666MHz SODIMM memory module. Specifically, this laptop supports up to 20 GB of RAM. That's because it has 4 GB that are soldered onto the board and an available slot that carries the other 4 GB that the laptop comes with.
This means that when you upgrade the RAM you won't be able to benefit from dual-channel RAM mode because both memory modules will be different since you can't remove the memory that's already soldered onto the board.
On that note, we would recommend, when upgrading the Ideapad 3 81X800ENUS to get your hands on a 16 GB compatible module of RAM since the fact that you won't be able to benefit from dual-channel RAM means you're going to have to compensate with a larger memory capacity overall to get that performance boost you're probably looking for.
You could also go for an 8 GB module for a total of 12 GB but we wouldn't really recommend that in this particular case because of what we said before.
Lenovo Ideapad 3 81X800ENUS Step-by-Step RAM Upgrade
First off, you'll need to make sure that the laptop is completely turned off and not just hybernating. You'll also make sure that the laptop is not connected to the power source or that it has any peripherals connected. For this upgrade, you're going to need to have a screwdriver on hand and you should also have a prying tool of some sort.
In this case, most people end up using a guitar pick. The important part here is that you don't use anything metallic so as to not damage any of the internal components when performing the upgrade or prying open the laptop.
Step 1: Place the Lenovo Ideapad 3 81X800ENUS on its back and remove all 12 screws attaching the bottom case to the rest of the laptop.
When that's done you can use your nails to remove the bottom cover or you can do so through the use of a prying tool like so:
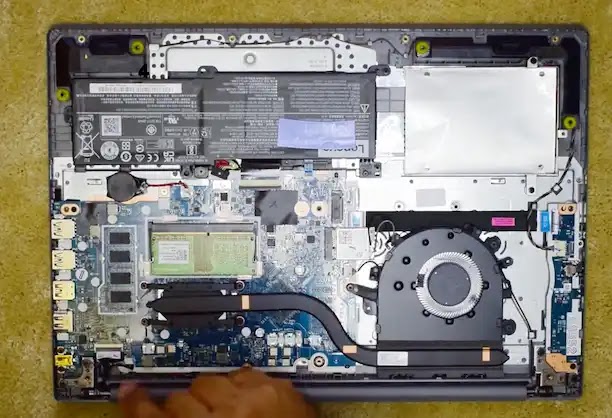
Step 2: Now that you have opened the laptop you will notice there's a single RAM slot available for upgrade as we've mentioned previously. In this pic, we've already implemented the RAM but all you have to do is insert the memory module at a 45-degree angle as if you were landing a plane.
When inserting the memory module in the memory slot you'll notice that there's a notch in both the module and the slot. What you want to do is to make sure that the pins align by making sure that the notch is also aligned. Here's an image of what that would look like on another laptop (it's the same on every single laptop).
Step 3: Now that the pins align and the memory module is inserted in a 45-degree angle you're going to have to gently but firmly press down on the module. You will hear the sound of the clasps located on the side of the slot latching onto the RAM, it will be a "click" sound that basically means you're good to go at that point.
Step 4: Re-attach the bottom case with its 12 screws and boot up the laptop. You have successfully upgraded the memory on the Lenovo Ideapad 3 81X800ENUS! If you want to double check you can do so by heading over to "device specifications" where you should be able to see the new amount of memory installed.
And that's it! Enjoy all the newfound freedom you get with a laptop that offers a better multitasking experience.


