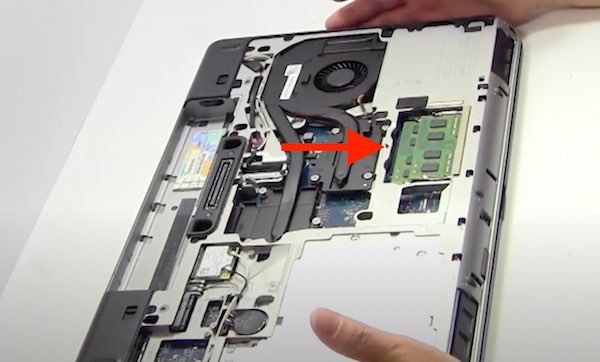
RAM upgrades can be a bit tricky. Not all modules work on all laptops as it depends on the processor and motherboard and the support that these elements give to memory. That's why it's pretty important to buy the right RAM module for your laptop.
If you bought the Dell Latitude E6540 you'll be finding out right about now that the onboard RAM falls short. Specifically, this model shipped with either 4 or 8 GB of onboard memory and these days that simply won't cut it if you're an avid multitasker. It's with that in mind that many people seek out to upgrade the internals on this otherwise very good laptop and today we're going to take you step-by-step on the process to do just that and upgrade the Dell Latitude E6540 RAM.
Dell Latitude E6540 RAM Upgrade
What type of RAM does the Dell Latitude E6540 take? How much RAM can I use?
This particular notebook takes a
204 pin 1.35v 1600 MHz DDR3 RAM. You can try using a different clock-speed or even a different voltage but quite frankly you'd be rolling the dice and the safest bet is to go with the manufacturer's specifications in this case.
How much RAM should I upgrade to?
In this particular case, we would urge users to upgrade to the
full 16 GB allowed through the use of two 8 GB modules. That's because this is an amount of RAM that will allow you to
work with multiple programs and tabs with ease whilst also future-proofing your device to make sure you can handle more RAM-intensive programs down the line.
What's more, if you switch laptops in the meantime you can always take the RAM you've bought and insert it into your new laptop assuming it's compatible.
On the other hand, if you come from a 4 GB notebook and you're an extremely casual user then you could get by with simply
upgrading to a total of 8 GB of RAM using
two compatible 4 GB modules of RAM.
Should I replace the onboard RAM?
When upgrading RAM many users come to us asking if they should buy a single module to insert on the available slot or if they should buy two compatible sticks. The recommendation is always pretty clear on this and you should ideally have two identical RAM modules working on your laptop both in size and specs.
This is because otherwise, manufacturers can't guarantee the RAM working in dual-band which is something that makes the system memory work much faster. If you have different RAM sticks you run the risk of the RAM working as single-band RAM. Sure, on paper you'll have more RAM on your device but the speed and performance won't be much better than what you already had to begin with which is why most RAM manufacturers sell RAM in packs of two.
Step-by-step RAM upgrade
In order to upgrade the memory of the E6540 you're going to need a Philips scredriver and a flat head screwdriver.
Step 1: Turn your laptop off. Not hibernate, off. After doing that turn your laptop upside down and remove the battery. Now, with your Philips screwdriver you're going to remove the screws attaching the bottom lid to the body of the laptop. Use the flathead screwdriver or your nails to pry the lower case from the laptop.
 |
See the RAM slots located on top of each other
|
Step 2: Once the lid is removed and the motherboard is exposed you can clearly see the two RAM slots. Depending on your configuration you might only have one slot being used and the other one empty. Either way, now you're going to remove the onboard RAM by pressing the clasps outwards on the side of the slots. This is an example using chopsticks but you can easily do it by hand (not an image of the actual laptop in this case).
Step 3: Insert the new RAM modules into the slots at a 45-degree angle starting with the bottom one. To know how to properly insert them you will see that both the memory slot and the RAM module have a notch located somewhere close to the centre.
What you need to do is have these two align. Once they're aligned you need to push firmly to that the RAM clicks and then press down so that the clasps close with the laptop "grabbing the RAM". This image illustrates how the notches should align:
Step 4: Once both RAM slots have been successfully filled up with the new modules you're going to go ahead and screw the back cover again, re-insert the battery and then turn the laptop back on.
Now you'll see a message that states that the memory in the system has changed (that's a good thing). Finally, to confirm that the RAM has upgraded properly head over to "Device Specifications" where you will see the new amount of onboard RAM under the line "Installed RAM". And that's all it took! As you can see it was easy and swift. In under 3 minutes you've successfully upgraded the RAM on the Latitude E6540. Congratulations!


