We've already done extensive coverage of the Acer Nitro 5 AN515-54-5812, first with the review, and later on with a quick tutorial on how to upgrade the RAM on the Acer Nitro 5 AN515-54-5812 - which we seriously encourage-. However, while upgrading the RAM will offer a significant boost to performance, what many users are interested in within this gaming laptop is the possibility to upgrade the storage.
That's why today we're going to walk you through the step-by-step process of upgrading the storage on the Acer Nitro 5 AN515-54-5812 by inserting both a PCIe NVME module as well as a 2.5-inch SSD SATA unit. In both cases, it's a pretty easy procedure that shouldn't take you much more than 5 minutes to perform. Let's get on with it!
Acer Nitro 5 AN515-54-5812 Storage Upgrade
What type of storage does this laptop support? How much Storage can I use?
First off you should know that the AN515-54-5812 features a dual shield with two NVMe SSD slots. You've also got your standard 2.5-inch SSD SATA bay. So you can upgrade both storage options. If you're deciding on upgrading just one then we would seriously encourage you to upgrade the NVMe unit instead of the 2.5-inch SSD SATA bay.
We recommend this because the 2.5-inch SSD SATA has a read/write speed of roughly 550 MBps whilst the NVMe SSD module can reach speeds of up to 3500 MBps and the pricing isn't that far off between the two.
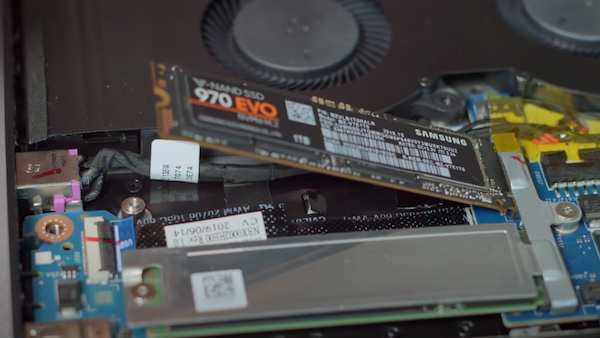
Having said that, you'll need a PCIe NVMe SSD M.2 module with a 2280 form factor. We recommend the Samsung Evo Plus model with 1 TB of storage, as this model has been tested and has worked well with this laptop.
On the other hand, if you also wish to upgrade the 2.5-inch SSD SATA bay with a storage unit you could purchase any 2.5-inch SSD SATA unit you wish.
How to perform the storage upgrade
Onto the actual procedure, you're going to need a Philips screwdriver and a pry to open the laptop. Something like this kit would work well.
Step 1: You're going to need to turn the laptop off before doing any kind of procedure on the laptop. Again, this bears repeating, the laptop should be off, not hibernating. Afterward, flip the laptop upside down and with the screwdriver remove all the screws located at the bottom case. Then, with the help of the pry you can gently but firmly remove the lower case.

Step 2: Once the laptop's internals have been exposed you will be able to quickly locate the storage bays. There are the storage bays on the AN515-54-5812.

Step 3: As a safety precaution we would recommend you remove the tape attaching the battery and unplug it like so. As you can see, we're not using a screwdriver to disconnect the battery because a screwdriver is metallic and we don't want to use anything that could transmit electricity.

Step 4: Now we're going to go ahead and remove the screw that's attached to the top PCIe NVMe slot to insert the storage unit you've bought.

Step 5: Insert the storage unit like so, making sure the right side is up and the pins are properly inserted into the slot. After doing that, place the metallic shield back on top of the storage unit and press down. Use the screw you removed earlier to attach the storage correctly to its place.
Step 6: Now onto the 2.5-inch SSD SATA bay. If you're going to also upgrade this storage unit then you're going to need to unscrew the casing and place the SSD inside it. Then you're going to use the 4 screws that come with the laptop to screw the SSD SATA drive into its place.

Step 6: Now you need to connect the SSD or hard drive that you've placed on the 2.5-inch bay with this connector that comes with the AN515-54-5812. Connect it and then place the bay pack in its original place, screwing it back to place.

Step 7: Finally, you're going to go ahead and connect the opposite end of the connector to the port that is located right next to the NVMe slots, next to the storage bay like so:

Step 8: Now that both storage units have been upgraded you can go ahead and connect the battery back on again - you disconnected it in step 3 -. Place the lower case back on, attach the screws and turn your laptop on. You're going to need to create new volumes and partitions for the new storage units but since you didn't replace the original storage you don't have to do any sorts of data cloning like you would have to on other laptops.
And that's it. You've successfully upgraded the storage on the Acer Nitro 5 AN515-54-5812. As you can see it's a simple procedure that simply requires you to spend a few minutes on it. Again, if you're considering buying this gaming laptop we encourage you to do so as it has some great specs overall but would definitely encourage you to also upgrade the RAM and the storage to make the most of it.