Acer has done a bang-up job over the past few years with its gaming division. The company has really managed to enter a very saturated market and set itself apart by launching affordable yet reliable gaming laptops. However, in order to offer affordable prices, the company has had to cut down on both RAM and storage, leaving these upgrades for the users to perform.
Such is the case of the ever so popular Acer Nitro 5 AN515-54-5812, which has managed to stay in the top 100 best-selling laptops for well over a year thanks to its competitive price point, compelling specs, and upgradability options.
However, while we love this laptop, it does come with a major handicap: 8 GB of RAM. So today we're going to walk you through how to upgrade the RAM on the Acer Nitro 5 AN515-54-5812 in 6 easy steps. Before you know it you'll be multitasking like a pro. Let's get on with it, shall we?
Acer Nitro 5 AN515-54-5812 RAM Upgrade
What type of RAM does it support? How much RAM can I use?
While it's true that the laptop already features 8 GB of RAM we would encourage you to upgrade to 32 GB to make the most of the laptop's features.
Specifically, for
gaming, as well as photo and video editing,
the more RAM you've got the better and if the RAM modules are identical that's even better since the memory can work as dual-band RAM. Of course, you could always ignore this friendly advice and just get another
8 GB compatible module for a total of 16 GB of RAM.
How do I get started with the upgrade?
First off you're going to want to place the laptop atop a cloth or any sort on antistatic surface. This is generally recommended when working with electronics though not necessarily a pre-requisite to doing the RAM upgrade.
You'll need in any case a Philips screwdriver and a
plastic pry such as this one. What you should never use to pry-open the laptop is a screwdriver as it's an electrical conductor by being a metallic object.
Step 1: Turn the laptop off. Very important first step. Not hibernate. Fully turned off. Place the laptop upside down and remove the screws located on the bottom cover. Then use the pry to gently but firmly pry the laptop open.
Step 2: Once the internals have been exposed it should look like this. As you can see the RAM slots are pretty easy to spot.
Step 3: This is not strictly necessary for upgrading the RAM but it can never hurt to unplug the battery. All you need to do is remove the upper tape and gently disconnect it so it isn't supplying energy to the circuits. Notice that
we don't use a screwdriver to disconnect the battery.

Step 4: Now that you've located the RAM slots, go ahead and remove the onboard RAM by pulling in an outward fashion on the side clasps of the RAM slots. This should release the RAM at a 45-degree angle.
Remove the onboard RAM and insert the RAM modules you've bought at a 45-degree angle aligning the notches of both module and slot like so and press firmly down until you hear a "click" of the clasps clutching the RAM modules.
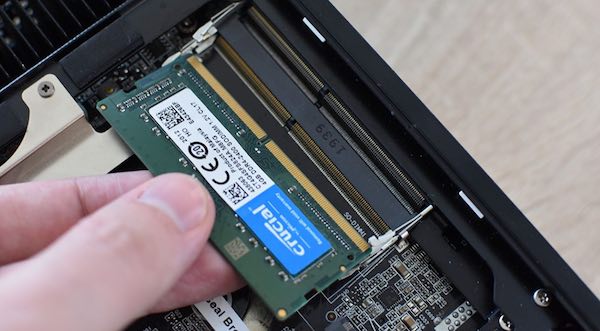 |
| Picture for illustrative purposes, not the laptop we're upgrading |
Step 5: While you've already managed to upgrade the RAM correctly, you could also unscrew the upper NVMe slot to add more storage. You can do so by using a
PCIe NVMe SSD M.2 2280 storage unit. All you need to do is remove the screw on the left-hand side of the shield, insert the storage like the picture below and place the shield back-on and you'd also be upgrading the storage.
Step 6: Connect the battery back, place the lower case back on the laptop, place the screwdrivers and turn the laptop on. You should now see on the "Device specifications" a line that shows the installed RAM. If you've also gone ahead and upgraded the storage then you should do a partition of the volume but that's another tutorial altogether.
For now, we hope you enjoyed this quick and straightforward tutorial on how to upgrade the RAM of the Acer Nitro 5 AN515-54-5812.


