
We've talked in-depth about the Acer Nitro 5 AN517-54-77KG, we even covered a tutorial on how to upgrade the RAM on the Acer Nitro 5 AN517-54-77KG. However, while many people will only be interested in upgrading the memory since this model features a 1 TB storage unit. Some of you may also want to upgrade the storage.
Today we are going to walk you through precisely that process. We're going to tackle how to upgrade the storage on the Acer Nitro 5 AN517-54-77KG.
How to upgrade the storage on the Acer Nitro 5 AN517-54-77KG
How many slots do I have? How much Storage can I upgrade towards?
Unfortunately, we have not been able to test this particular model out, only a model within this series. However, Acer, like all manufacturers, repeats the same internal design on all its models. Having said that, we would seem to have an empty PCIe NVMe SSD Slot, as well as a 2.5-inch SSD SATA slot.
If you're going to choose between the two we would highly encourage you to go with an extra PCIe NVMe SSD module (the m.2 form factor is 2280). We encourage you to upgrade this unit because it delivers far greater read/write speeds (up to 6 times faster than a conventional SSD) whilst the price is fairly similar. Being able to purchase a Samsung 970 Evo Plus 1 TB unit at roughly the same price as its SATA SSD counterpart.
In any case, you can upgrade both the available PCIe NVMe SSD unit and the available SATA SSD unit (you could also place an HDD here but that's not recommended). In this case, you could upgrade 1 TB on the NVMe slot and as much as you wanted on the SATA SSD slot, though we wouldn't recommend much more than 1 TB.
For this tutorial, we're going to explain how to upgrade both available slots.
How do I perform the upgrade?
First off you want to make sure your AN517-54-77KG is turned off. Not hibernating. Off. You're going to need a Philips screwdriver and a pry to help you pry-open the laptop. This kit should do the job.
Step 1: Place the laptop upside down, remove the screws.

Step 2: Having removed the screws you're going to go ahead and pry-open the laptop. Start from the front as it's a bit easier because there's a small hinge. If you don't see a hinge on the front, do it from wherever you see a hinge.

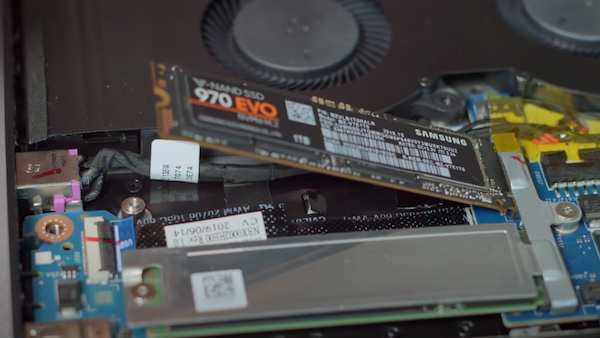
Step 3: Now that you've uncovered the internals of your laptop you should see two PCIe NVMe slots, and a 2.5-inch SSD slot. It's recommended that you unplug the battery. Not terribly necessary but if you can simply remove the tape and unplug the battery as a safety precaution. Here's what it should look like:

Step 4: To upgrade the PCIe NVME SSD slot - remember to get the right form factor as indicated above - you need to unscrew the empty slot like so:

Step 5: Insert the NVMe slot into its place, and then place the metallic lid back on and screw it back into place. Now you have successfully upgraded the NVMe storage. Let's move on to the SSD SATA Unit. If you're not going to do that upgrade you can reconnect your battery and place the lid back in.
Step 6: Remove the metallic SATA bay and insert the 2.5-inch SSD SATA storage unit. Use the screws that typically come with it to properly attach it to its place.

Step 7: Grab the connector and insert it into the SSD unit and connect that to the internal circuitry of the laptop like so. As you can see, the connector is located right next to the lower PCIe NVME slot. However, in your model, it might be placed somewhere else so be sure to locate it. In any case, you should connect it as the image shows and it's always placed nearby the SATA bay.

Step 8: Now that you're done upgrading both forms of storage, connect the battery back on, place the lid, place the screws and turn the laptop back on. You're going to need to create new partitions for the new storage units but that's another quick and easy tutorial.