When it comes to gaming laptops RAM is extremely important, the more RAM your laptop has, the better it can handle AAA games. However, though laptop memory is critical, many manufacturers will opt for giving the user the ability to upgrade the RAM to their liking whilst delivering a model with just enough memory to work properly.
Such is the case with Asus's more affordable models within the ROG STRIX G15 lineup. But not to fear, today I'm going to walk you through the process of upgrading the RAM on the Asus ROG Strix G15 G513. Are you ready? Then let's get cracking!
ASUS ROG Strix G15 G513 RAM Upgrade Step-by-Step
What kind of RAM should I buy? How much RAM does the laptop support?
First off, you need to make sure you're using the right RAM module when installing more memory on the G15 G513. Specifically, this laptop takes a DDR4 PC4-25600 3200 MHz SODIMM memory unit. That essentially means it uses SODIMM type memory of the DDR4 standard that clocks at 3200 MHz.
Depending on the model you've got you're going to have both RAM slots occupied so any upgrade should be made taking this into account. And by that, I mean that you're going to need to upgrade both memory slots to perform an upgrade as this laptop isn't like others in the market where the manufacturer only makes use of one of the RAM slots.
With that in mind, you can upgrade to a maximum of 64 GB through two compatible 32 GB units, upgrade to 32 GB with two 16 GB modules of RAM, or upgrade to 16 GB through two units of 8 GB, though this upgrade is less likely.
In any case, be it that you opt for 32 GB or 64 GB of RAM you really can't go wrong in any of the two cases.
Step-by-step guide to Install More RAM on the Asus ROG Strix G15 G513
Step 1: Before taking your laptop apart you need to make sure the laptop is turned off and disconnected from the power supply. You don't want to get any sort of electrical discharge while performing the upgrade.
Once you've made sure the laptop is turned off you're going to place it on its back and remove the 11 Philips headscrews. Now that the screws have been removed you're going to need to make use of a prying tool of some sort to open up the laptop in a gentle yet firm manner. We recommend making use of a guitar pick though if you don't have one you could always get this cheap prying kit.
What you don't want to do is to use a screwdriver as you might damage your laptop.

Step 2: Once you've managed to separate the lower case from the chassis through the use of the pry tool be careful when removing the lower case as it holds the LED strip ribbon cables and you don't want to break them. Disconnect them and you'll be good to go to remove the lower case.
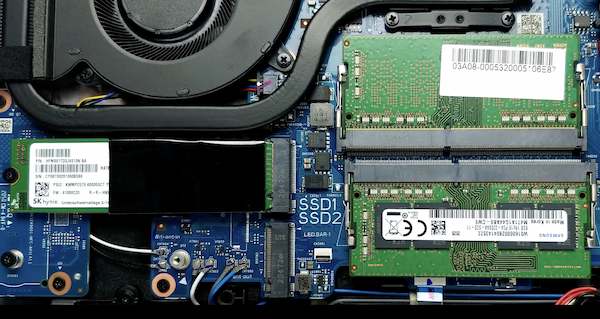
Step 3: Now that you've exposed the G15 G513's internal you'll quickly see the two RAM slots currently being occupied by the onboard RAM.
Step 4: Remove the onboard RAM by pulling outwards on the metallic levers located on the sides of the RAM slots. Doing this will release the memory at a 45-degree angle, at which point you should pull it out in the same angle. Don't pull upwards to remove the RAM or you might damage the DIMs.


Step 6: Finally, press down on the memory unit and you'll hear the clicking sound of the clasps clutching to the RAM. Screw the bottom case back in its place and turn the laptop on. It's going to take a few seconds longer than usual for the Asus ROG Strix to boot up since the BIOS is going to be scanning for the new memory units but after that, you should be able to boot your laptop normally.
If you want to confirm that the upgrade was successful simply head over to Device Specifications and you'll see the new amount of memory reflected under the "Installed RAM" line.
In any case, as you can appreciate, it's a rather simple process that doesn't take much more than a few minutes to perform. Along the way, you could also install an additional M.2 PCIE NVME SSD unit since there's an available slot located on the left side of the RAM slots, below the onboard NVME slot.