Overall, the HP 15-eg0025nr, which we actually reviewed late last year, is a great laptop that features a solid set of internals. However, while 16 GB might be enough for most users, for serious power users it will fall short and they will benefit from upgrading to either 32 or 64 GB worth of RAM. Today I'm going to walk you through this step-by-step guide on how to upgrade this laptop's memory.
HP 15-eg0025nr Step-by-step Memory/RAM Upgrade
How much RAM may I Install? What type of memory may I use?
Before we go ahead and disassemble the HP 15-eg0025nr we need to make sure our upgrade is feasible. To do that we need to make sure we're upgrading to an amount of RAM that's compatible with the motherboard and a type of memory that's also compatible.
To that point, the 15-eg0025nr accepts up to 64 GB worth of RAM. A big step up from the 16 GB of memory with which it lands.
Should you upgrade to 64 GB? That's going to heavily depend on your usage but honestly, unless you're editing 4K video at a professional level it's hard to see a scenario where you would really benefit from such a colossal amount of RAM in a way that would be noticeable on your day to day basis. Having said that, if you are one of said users then you'll be happy to know that you can in fact install two compatible 32 GB modules.
That's why our professional opinion, for most users, is to upgrade to 32 GB of RAM in this case by making use of two 16 GB modules of compatible RAM.
As far as the type of memory is concerned, you're going to need to use a DDR4 PC4-25600 3200MHz Non-ECC SODIMM memory That's a DDR4 module of memory with the SODIMM form factor and a clock speed of 3200 MHz.
How Do I Install More Memory in the HP 15-eg0025nr?
Step 1: We've said this time and time again as we guide people through our RAM Upgrades but remember to make sure your laptop is turned off and disconnected from the power supply. That's always going to be step one. Otherwise, you might end up getting a seriously uncomfortable electrical shock.
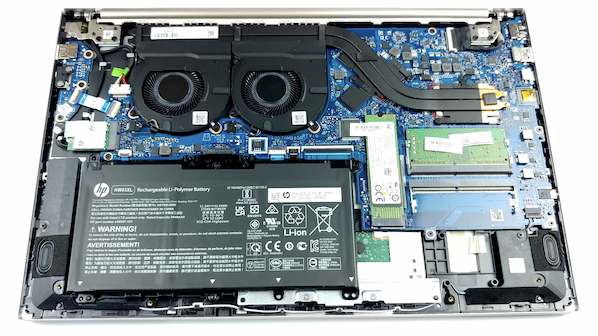
Step 2: Once you've made sure the laptop is turned off you're going to place it on its back and remove all the screws attaching the bottom cover to the chassis. As it happens with many of HP's laptops, you're going to need to remove the rubber band located on the top and lower half of the bottom cover.
Underneath each of these bands, you'll find three screws that you'll need to remove. Make sure your hands are clean so you don't stick anything to the adhesive of the bands and make sure you remove them as gently as possible to be able to insert them again once you're done.
Step 3: Finally, make use of a prying tool of sorts to help you open up the laptop. Many people make use of a guitar pick. Under a pinch you could make use of a sturdy credit card. However, if you foresee opening more than one laptop we would recommend you get yourself a kit for prying open devices such as this one, they're very affordable and very useful for this type of tasks.
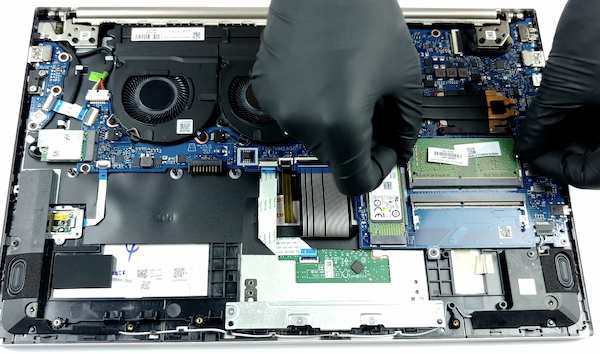
Step 4: Now that you've opened up the laptop your eyes will quickly go towards the two RAM modules located on the right side of the laptop. As you can see, one of the slots is being used by the onboard memory and the other slot is empty.
Otherwise, if you have a laptop with two RAM modules that feature different specs you could end up with a laptop that effectively has more memory but doesn't benefit from the substantial speed-bump that comes from making use of two identical RAM modules known as dual-channel RAM.
To remove the onboard memory simply place your hands on the sides of the slot and pull outwards on the levers. This will release the memory module at a 45-degree angle. You must remove it at that angle as well. Do not try to pull the RAM upwards or you run the risk of breaking the DIMMs. Simply remove it as if you were taking off a plane, a 45-degree angle.
Step 6: Now that you have removed the onboard RAM it's time to insert your RAM modules. To do so simply introduce them at a 45-degree angle as you did when removing the onboard memory on the previous step. Make sure that the notches on the module and the notch on the slot align properly. This is an image of what that would look like:
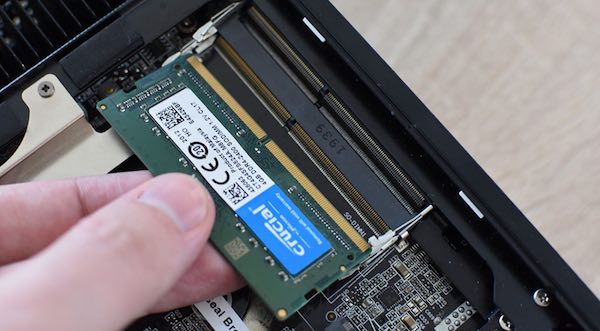
Step 7: Now that the memory has been inserted properly you need to press down firmly yet gently. When doing so you will hear a clicking sound. That's the sound of the metallic levers or latches clutching onto the memory module.
And that's it. You can now re-attach the bottom cover to the chassis and place the screws back into place as well as the adhesive rubber bands you removed at the beginning of this tutorial. Finally, to confirm that the memory has been properly installed turn the laptop on.
You'll notice it will take a few more seconds than normal to turn on. That's because the BIOS is scanning the additional RAM. Once the 15-eg0025nr is powered on, under "device specifications" you will be able to see that the RAM update took and you'll see the new amount of memory in the system.