We've talked a lot about Acer laptop RAM upgrades over the past couple of months. That's because a lot of people are seeing that while the standard memory laptop's come with is good for casual users, for more intensive multitaskers who like to work on multiple programs at a time and have dozens of tabs open to reach their maximum productivity it just doesn't cut it.
But fear not because the RAM upgrade is quite possibly the easiest and fastest upgrade you can do without little to no technical knowledge. It's with that in mind that today I'm going to walk you through the Acer Aspire 5 Slim A515-54-59W2 RAM upgrade.
The Acer Aspire 5 Slim A515-54-59W2 is an excellent laptop at a killer price that features a top-notch 10th generation Core i5 processor, 256 GB of SSD - we will cover a storage upgrade later on -, a Full HD display, and a very generous suite of connectivity options. Without further ado, let's get on with this tutorial.
How To Upgrade the RAM/Memory on the Acer Aspire 5 Slim A515-54-59W2
What you're going to need to do before you go ahead and just buy any RAM module that "feels right" is know exactly what type of memory module is compatible with this laptop and the amount of RAM you can install. Not all laptops support the same amount of memory nor the same type so this is actually a pretty big deal.
What type of RAM does the Acer Aspire 5 Slim A515-54-59W2 use? How much RAM Can I Install?
As far as how much RAM you can install, you can go up to a maximum capacity of 20 GB.
How much memory should you install? Well, that's going to depend on your usage. However, in my opinion, considering how small of a price difference we're talking about, it pays to go all the way up to 20 GB and not have to worry about having insufficient memory down the line.
It's a small price difference in exchange for knowing that you can work comfortably with dozens of tabs open without fear of the laptop freezing up on you.
Step-by-step tutorial to upgrade the RAM on the Acer Aspire 5 Slim A515-54-59W2
Before doing anything to the laptop you need to make sure it's turned off and disconnected from the power source. You should also have a Philips screwdriver on hand, and you would also benefit from using rubber gloves just as a safety measure to avoid any potential residual electricity.
Step 1: Place the laptop on its back with the hinge facing you. You're going to go ahead and remove all eleven screws attaching the bottom case to the chassis.
Once the screws have been removed you're going to make use of a prying tool of some kind to start to separate the case from the chassis releasing the clips that are attaching the chassis as you go along. Most people will use a guitar pick, for example, or a credit card. This is what that would look like:
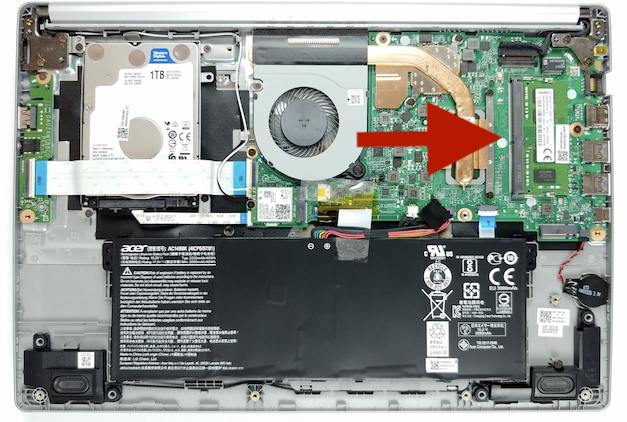
Step 2: Now that you've managed to separate the bottom case from the chassis just remove it altogether to see the internals.
Step 3: When you've accessed the internal components you will be able to quickly spot the RAM slot, which already has a 4 GB module inside.
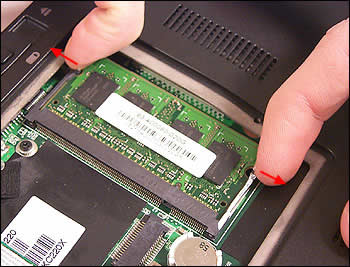
Step 4: Now you're going to remove the memory module that's occupying the slot. To do that, all you need to do is pull outwards on the metallic clasps located on the sides of the memory slot. Here's an
illustrative image of what that would look like. This would
release the module at a 45-degree angle. Once that's done you need to remove it at that angle as if it was a plane taking off.
Step 5: Now that you have removed the module, you're going to grab your own module and insert it into the slot, also at a 45-degree angle, making sure that the notch on the module and the notch on the slot align. Essentially, making sure that all the pins align. Here's an illustrative image of what that would look like:
Step 6: Now that you've inserted the RAM onto the slot you're going to press down on the module until you hear the clicking sound of the metallic clasps grabbing onto the module. That's the sound of victory, the sound that indicates that you have successfully inserted the RAM module.
All that's left for you to do now is to place the bottom case back to the chassis with the eleven screws you've previously removed. Turn the laptop on, wait a bit longer than usual as the BIOS scans through the new module and that's it.
Depending on your configuration you could be greeted by a message that says that a new memory was detected in the system. If that doesn't happen you could also just head on over to device specifications -> Installed RAM and you'll be able to see the new amount of memory on your system.
You're done! As you can see, it's a very easy procedure and now you're going to be able to enjoy multitasking to your heart's content.