
Here at 9to5gadgets we talk a lot about RAM upgrades. However, the memory upgrade is not the only upgrade that we can easily perform on a laptop with little to no technical knowledge. You can also typically upgrade the storage with the addition of either an extra NVMe SSD unit or a standard SSD drive. Today we're going to walk you through upgrading the storage on the Acer A515-54 lineup of laptops. A fairly simple process that shouldn't take you much more than 5-10 minutes in total.
So, how do you do it? What type of storage unit can you use? That's what we're going to be covering here in great detail with a lot of pictures to make sure you can perform the upgrade quickly and easily.
How to Upgrade the Storage on the Acer Aspire 5 A515-54
Before going ahead and dismantling the Acer A515-54 you need to know a couple of basics. Primarily the type of storage that this laptop accepts.
What type of storage unit can I use?
For this upgrade, you're going to need to make use of a 7mm or 2.5" SSD Drive. You can find these units in an assortment of capacities. We would recommend 1 TB of compatible storage to future-proof your device properly. But you could also upgrade to an additional 512 GB of compatible storage if you don't need that much storage space.
Very important that you make sure you are buying a 2.5-inch drive and not a bigger format since bigger formats are not supported in this notebook series.
Step-by-step tutorial on performing the storage upgrade on the Acer Aspire A515-54
The first thing you need to do is make sure that the laptop is turned off and disconnected from the power source. You're going to need to make use of a screwdriver as well as a prying tool of some sorts to separate the base of the laptop from the chassis.
Step 1: Once the laptop is turned off and disconnected, place it upside down and remove all eleven screws attaching the chassis like so:

Now that you have removed the screws you're going to use a prying tool to separate the case making sure to release the clips one at a time. Many people here use guitar picks for this procedure but you could also use a plastic device such as the one used here:

Step 2: Once the case has been removed you're going to open up the laptop and see what's under the hood. We would recommend at this stage that you disconnect the battery. Generally speaking, this isn't necessary but since you're going to also remove the wireless card it's strongly recommended.
Step 3: You'll notice there's a mounting bracket located on the right side, as well as a connector that's beneath said bracket and that you will use later on to connect the drive. You're going to remove the four screws that are attaching the mounting bracket to the mainboard like so:

Step 4: Once you have removed the bracket and the connector you're going to connect the connector to the drive. There's only one way in which you can connect them so it's fairly intuitive.

Step 5: Now that the drive is connected to the connector you're going to insert it into the mounting bracket like so:

Step 6: The Acer A515-54 should've come with four small mounting screws. These screws are going to be used to firmly attach the drive to the mounting bracket.

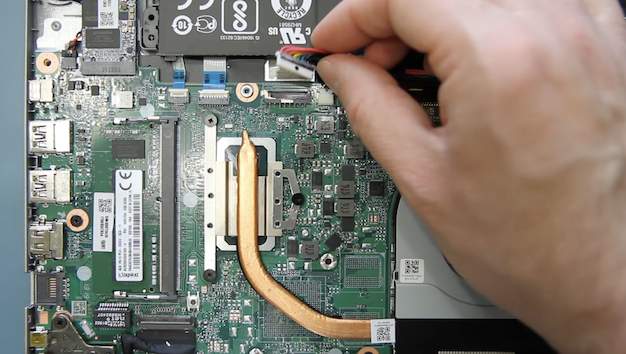
Step 8: Now you need to connect the drive to the mainboard. To do that you're going to need to remove the wireless card since the connector for the drive is located right beneath it. Just grab your screwdriver and unscrew the wireless card, gently remove it and set it to the side.


Step 10: Now that the connector clip is unlocked, insert the cable that runs from the drive to that connector. Make sure it's inserted properly in its place and then lock the connector once again.

Step 11: Now you're going to insert the wireless card back in its place, using the screw you removed previously.

Step 12: Finally, you're going to connect the battery once again since you've disconnected it at the start of the tutorial to upgrade the storage on the Acer A515-54. Once that's done all you need to do is place the bottom case back in its place and turn the laptop on. You're going to need to format the drive and create a new volume but that's a pretty straightforward process where you just click "next" a bunch of times.
And that's it! You have successfully upgraded the storage on your Acer laptop and you're no longer constrained by the amount of storage that came with the laptop, being able to store a lot more content. Finally, don't be intimidated by the number of steps involved.
We tried to make this tutorial as comprehensive as possible so that you wouldn't miss anything when upgrading the storage. In reality, it's a very quick process that shouldn't take you more than 10 minutes to perform.