When it comes down to laptop upgrades, the memory upgrade is, without a doubt, one of the easiest and most beneficial upgrades we can do. In fact, it's become so common that users would opt to do this procedure themselves that manufacturers will typically leave an empty slot available to make it as easy as possible. And the case of the HP EliteBook 840 G6 is no exception.
The HP EliteBook 840 G6 lineup comes in a variety of versions or series with different amounts of RAM and storage capacity.
However, if you opted to buy a version that you've come to realize after some use that it doesn't feature enough memory since it lags behind and can't keep up with your multitasking needs then rest assured that today we're going to walk you through the process of upgrading the RAM on the HP EliteBook 840 G6 in a quick and easy fashion.
Let's get on with it!
How to Upgrade the RAM/Memory on the HP EliteBook 840 G6
Before you start the disassembly process there are a few bases that you should cover. First off you're going to need a Philips screwdriver as well as the right RAM module. You'll also need to know how much RAM you can upgrade the HP EliteBook 840 G6 to in total.
What Type of RAM Does the HP EliteBook 840 G6 need?
How Much RAM can I Install?
On the Elitebook 840 G6 you've got two memory slots available for upgrade. Each of them supports a maximum memory of 16 GB. That means that you can upgrade the memory to maximum capacity of 32 GB in total. There is no RAM soldered onto the motherboard like with other notebooks.
Depending on your configuration you're going to need to decide how much memory you want to upgrade towards. Remember, however, that it's best to have both RAM slots have identical RAM units so that the memory can work in dual-channel mode, optimizing the performance significantly. Many people don't do this and while they technically end up with more memory it doesn't work as well as having two identical units.
However, if you're a
hardcore user that's going to be
working with numerous RAM-intensive programs as well as have
dozens of tabs open at a time then you'd be better-served upgrading to the
maximum capacity of 32 GB with
two 16 GB modules of RAM.
We can't decide this for you so you're going to need to consider what type of usage you're looking to get out of this laptop. Having said that, we will say that it's always better to have more memory than you need so as to also future-proof your notebook as the newer software requires more and more RAM as time goes by.
Step-by-Step RAM Upgrade on the HP EliteBook 840 G6
As we stated before, you're going to need a screwdriver. You would also benefit from using anti-static gloves. However, if you don't have any of those lying around then a set of rubber gloves will do. This is mainly a security measure to avoid any small electrical discharge that can potentially happen when opening up a laptop.
Step 1: The first thing you need to do is make sure the HP 840 G6 is turned off and disconnected from the power source. Sounds like a simple enough step but you'd be surprised at the number of people who forget to do this.
Once that's done place the laptop on its back and, with the help of the screwdriver, remove all the screws that are attaching the bottom case to the chassis.
Once that's done you can remove the bottom case. For this procedure, many people will use a prying tool such as a guitar pick but you could also use a credit card. In this particular notebook, it's not difficult to separate the case. Here's an example of how you would use a prying tool to open up the chassis - though on a different notebook - :
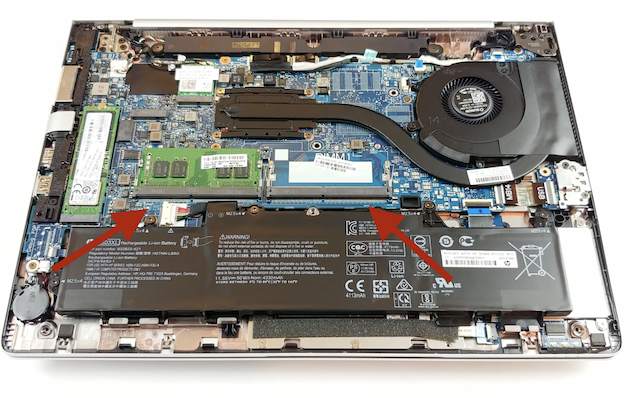
Step 2: Now that you have managed to open up the laptop you will see the two memory slots. Depending on the configuration you bought of the HP EliteBook 840 G6 you might see both RAM slots filled or just the one like in this version.
Step 3: If you've opted, as recommended, to get two identical memory modules, then you're going to need to remove the onboard RAM. To do so all you need to do is pull outwards on the metallic clasps located on the sides of the memory slot. This will release the memory at a 45-degree angle, at which point you may retrieve it.
The following image - though not of this particular model - is meant to show you how the memory module is extracted. It's the same on every notebook:
Step 4: Now that you have removed the onboard memory it's time to insert the RAM you've bought. For this, you will reverse what you previously did by removing the onboard memory. That means that you will introduce the memory at a 45-degree angle. Whilst doing so, make sure that the notch on the memory module and the notch on the slot align like so:
Step 5: When the memory has been properly inserted with all the pins aligning, press gently but firmly in a downward direction to make the RAM "stick" to the motherboard. You will hear the clicking sound of the metallic clutches grabbing onto the memory module. That means that the RAM has been properly placed.
Step 6: Re-attach the bottom case and turn the laptop on. You will notice that it takes a bit longer than usual to boot up because the BIOS is scanning the new RAM modules. Once the laptop is up and running you can confirm that the memory upgrade went well by heading over to "Device Specifications" and looking at the "Installed RAM" line.
And that's it! You have successfully upgraded the RAM on the HP EliteBook 840 G6. We hope you enjoy all the new possibilities that this brings in terms of performance and productivity by not having to deal with the laptop lagging on RAM-intensive tasks.


