When it comes down to performing upgrades to a laptop there are two main upgrades that most users will notice fairly quickly: swapping an HDD for an SSD and upgrading the memory. Today we're going to be walking you through the latter. Specifically, we're going to go ahead and upgrade the RAM on the Lenovo IdeaPad L340-15API.
This particular laptop has been sold in several configurations. However, in the best case scenario you're going to be limited to 8 GB of RAM and 4 GB in the lowest configuration. If you're a casual user 8 GB is fine. However, if you - like me - have a habit for working on multiple tabs open at a time with numerous programs running in the background then you're going to need to upgrade the RAM to prevent the IdeaPad L340-15API from lagging behind because of insufficient memory.
It's a fairly easy process. No matter if you come from a configuration with 4 GB of RAM or with 8 GB, it's a really straightforward process that shouldn't take you much more than five minutes to execute once you have everything you need. Let's get on with it!
How to Upgrade the RAM/Memory on the Lenovo IdeaPad L340-15API
Before doing anything you need to know what RAM module this notebook supports as well as how much memory you can install. You should also know that you're going to need a Philips screwdriver, a prying tool of some sorts and we would recommend either rubber gloves or anti-static gloves to perform the upgrade.
What Type of RAM Do I Need? How Much Memory Can I Install?
For the
Lenovo IdeaPad L340-15API RAM upgrade you're going to need to get your hands on a
DDR4 PC4-19200 2400MHz Non-ECC SODIMM memory module. That's a fancy way of saying you need a
DDR4 memory module that clocks in at
2400 MHz and has the SODIMM form factor.
As far as how much memory you can install, you should know that this notebook already features 4 GB soldered onto the motherboard so we can't touch that. However, the notebook also features a SODIMM slot which, depending on your configuration is either empty or has a 4 GB module inside.
We are going to walk you through both scenarios. If it's empty all you need to do is pop the RAM module inside and if it has a 4 GB module already in the slot you're going to have to remove it and replace it with your new memory module.
The
Lenovo IdeaPad L340 takes a maximum of
20 GB of RAM. That means that excluding the 4 GB that are already soldered onto the board you can opt to insert a compatible
16 GB of RAM,
8 GB of RAM, or
4 GB of memory.
From here on it's going to depend on how demanding you are as a user. 8 GB of total RAM is good for casual users, 12 GB means you'll be able to get some serious work done and 20 GB means that while you may not use all of the memory you won't have to worry about ever running out and having the laptop freeze up on you.
Also, remember that as time goes by the software we use takes up more and more RAM to function properly so it's always best to have more memory than you strictly need.
Step-by-step Memory Upgrade on the Lenovo IdeaPad L340-15API
Before doing anything remember that your laptop should be turned off and disconnected from the power source. We can't stress this enough as we wouldn't like anyone to get an unpleasant shock when working on the upgrade. It's also recommended that you use either rubber gloves or anti-static gloves.
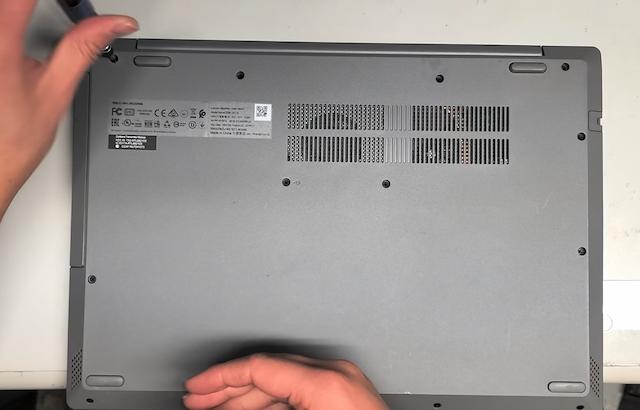
Step 1: Now that the laptop is turned off, place it upside down and remove all the screws attaching the bottom case to the chassis of the notebook.
Once all the screws have been removed you're going to go ahead and use a prying tool of some sorts to separate the bottom case from the chassis.
Most people will use a guitar pick if you have one handy but you could also use a credit card. This is a demonstrative image of how you should go about that:
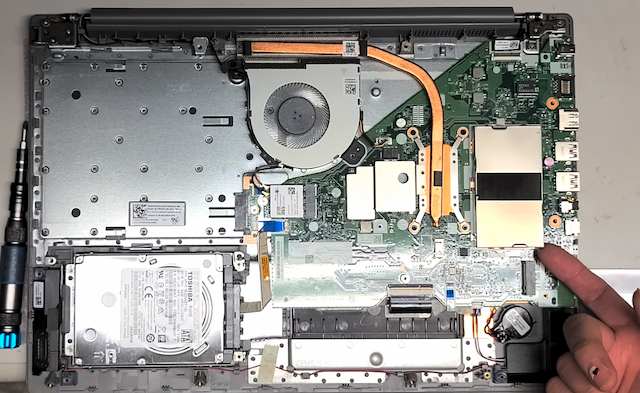
Step 2: Now that you've opened up the IdeaPad L340 you'll notice there's a heatshield located on the right side of it. Below that, you'll find the RAM slot.
It's just above the battery we removed in this image because we were on our way to perform another upgrade that required we remove the battery.
Step 3: Go ahead and remove the heat shield. If you've got a version that features 8 GB of RAM then you're going to have a 4 GB module in there.
To remove it all you need to do is pull outwards on the clasps located on the sides of the RAM slot. You can do it by hand very easily but here's a gif with sticks to show you more clearly the mechanics of the process.
The memory module will be released at a 45-degree angle and that's how you should extract the RAM so as to not damage the pins on either the module nor the slot.
Step 4: Now you're going to go ahead and insert the RAM module you've bought. We hope you got at least an 8 GB module to really notice a significant boost in performance.
To do that you need to insert the RAM module at a 45-degree angle making sure that the notch on the module and the notch on the slot align. Here's what you're aiming for in an example image:
Step 5: Now that the RAM has been inserted well into the slot you're going to press gently but firmly down. You're going to hear a "clicking sound". That's going to be the sound of the clutches or the clasps "grabbing" onto your new memory module. That means that you have successfully inserted the RAM in the slot.
Step 6: All you need to do now is re-attach the bottom case to the chassis using the screws you took out on step one. Once that's done you can turn your laptop on.
Don't worry if it takes a bit longer than usual to boot up, that's because the BIOS is scanning the system to incorporate your new memory module into the process. When the laptop turns on, go ahead and check out your "Device Specifications" where you'll see the new amount of memory in your system under the "Installed RAM" line.
That's it! Congratulations! You have successfully performed one of the best upgrades you could do on a laptop to open up new possibilities in terms of everyday performance. Hope you enjoy not having your laptop freeze up anymore and being able to have numerous programs running at a time without the Lenovo IdeaPad L340-15API so much as break a sweat.