We've covered quite a few RAM Upgrade tutorials over here at 9to5gadgets. Most of them tend to be fairly similar and it's generally a task that will rarely take you much more than five minutes once you've purchased the right RAM module.
However, once in a while, you run into a successful notebook that makes things a little bit more interesting and poses a bit more of a challenge when it comes to upgrading the memory modules. Such is the case today with the MSI Stealth 15M lineup, and today we're going to walk you through the step-by-step process of upgrading the RAM on the MSI Stealth 15M.
MSI Stealth 15M RAM Upgrade Tutorial Step By Step
There are several models under the Stealth 15M lineup. Some of them feature more memory whilst others feature less. In any case, this tutorial aims to help anyone that has one of these notebooks to be able to easily upgrade the memory.
What Type of RAM do I need to buy for the MSI Stealth 15M? How much RAM can I use?
Before you get ready to open up your laptop you should know beforehand that your laptop features two RAM slots, both of which are being used to be able to provide you with dual-channel memory.
This makes your laptop run processes faster and be better at managing multiple tasks. You'd think that most laptops would deliver two RAM modules being that they all offer dual-channel RAM these days but actually it's quite rare so that's definitely something we valued in the MSI Stealth 15M.
In any case, the MSI Stealth is compatible with DDR4 PC4-25600 Unbuffered NON-ECC 3200 MHz memory modules. This is a long way of saying you need a DDR4 type RAM module with a 3200 MHz clock speed and a SODIMM 260 pin interface.
The 15M supports up to 64 GB of RAM, which means you can place up to 32 GB of compatible RAM on each of the two available slots.
Depending on your model it will come with more or less RAM but in any case, it is advisable that you switch up both RAM modules because if they're not exactly the same type of RAM you won't benefit from dual-channel RAM and whilst it's true that you'll technically have more memory, you won't notice all the benefits because of a lack of dual-channel memory.
How Much RAM Should I Get on the MSI Stealth 15M?
This is a bit of an issue of personal taste but we'd recommend at least upgrading to a full 32 GB worth of RAM with two compatible 16 GB modules.
This should suffice most users, especially considering the high-end processors this laptop makes use of in its different variants but if you really want to go all out because you're going to use the laptop for AAA Gaming as well as rendering 8K files, editing videos and pictures on photoshop as well as running several virtual machines then you could always opt for going all out to 64 GB.
How to Upgrade the Memory on the MSI Stealth 15M
To proceed with this operation you're going to need a Philips screwdriver, a pry of some sorts and we would recommend using rubber gloves or anti-static gloves to avoid any potential static electricity. Once you've got all that then you're good to go.
Step 1: Before doing absolutely anything it's very important that you make sure that the MSI Stealth 15M is turned off and disconnected from the power source.
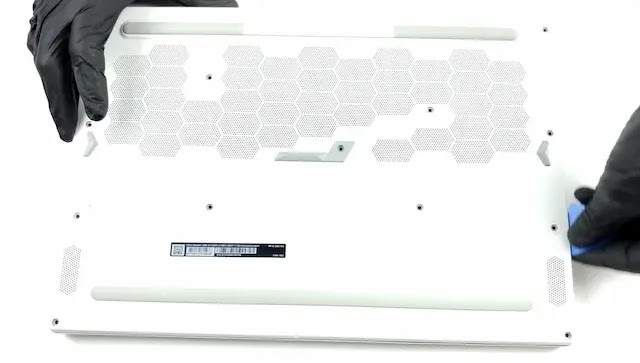
Now that you've made sure of that you can go ahead and flip the notebook on its back and start removing the screws that attach the bottom case to the chassis of the laptop. Once the screws have been removed you're going to need to use a pry tool to wedge yourself in there to separate the case from the chassis like so:
Step 2: Generally speaking, it would be pretty easy from now on. However, in the case of the Stealth 15M there's a bit more work involved.
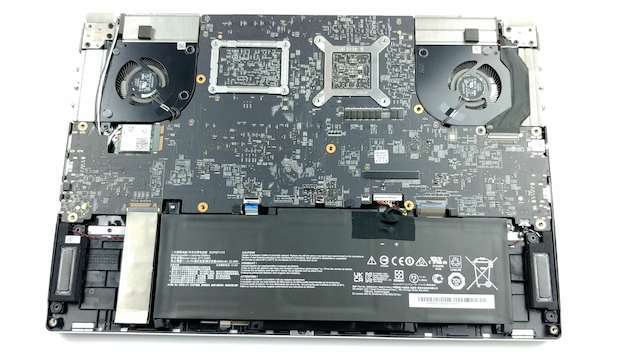
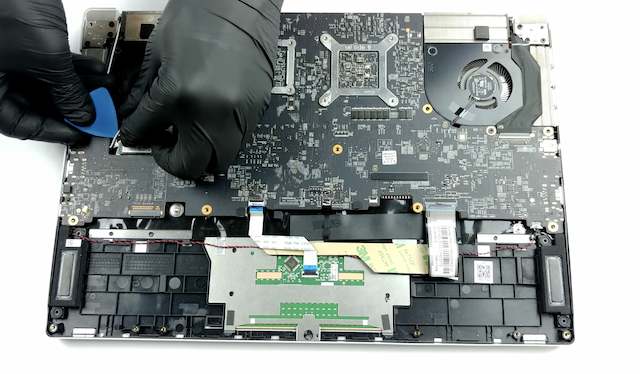
Now that you've accessed the internal components you're going to see that the motherboard is flipped over to protect its key components. Therefore, you're going to need to remove the screws attaching the battery as well as the connector of the battery like so:
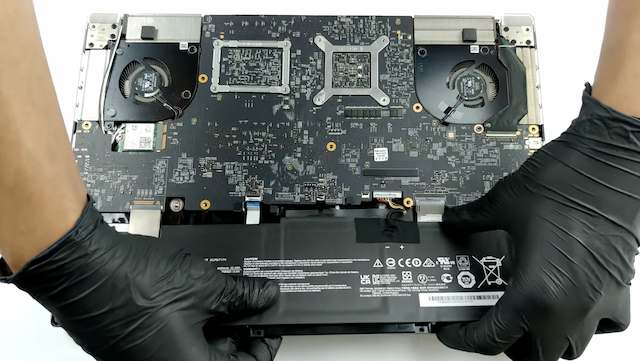
Step 3: Now that you have successfully removed the battery you're going to need to do the same for the NVMe SSD storage unit located on the left of the battery. This is easy, all you need to do is remove one screw and extract the unit like so:
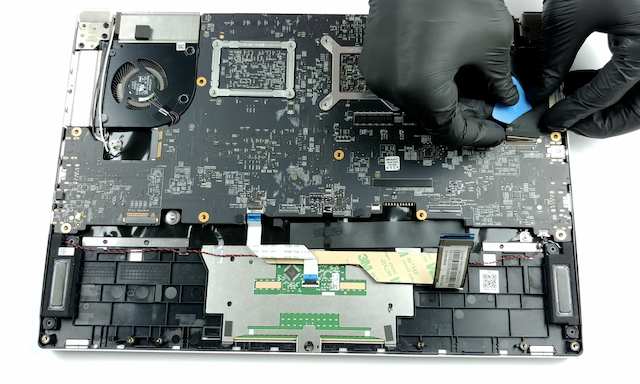
Step 4: You're getting closer! Now you need to remove the wireless internet card located atop the motherboard, slightly above the storage module you've just removed. Here it is:
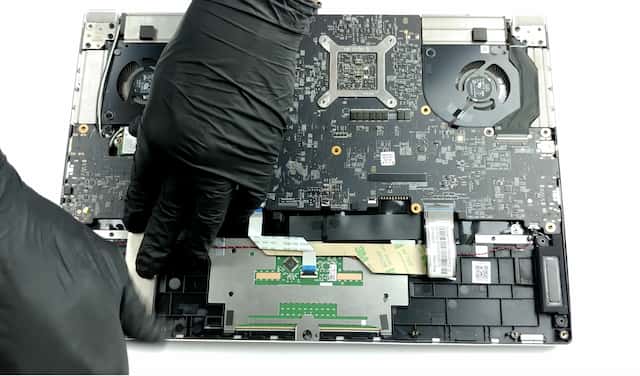
Step 5: Now you're going to remove the connector located next to the right fan. On your way to doing that you could also go ahead and remove the two connectors that you see connecting to the motherboard from where the battery used to be, the two white ribbon cables.
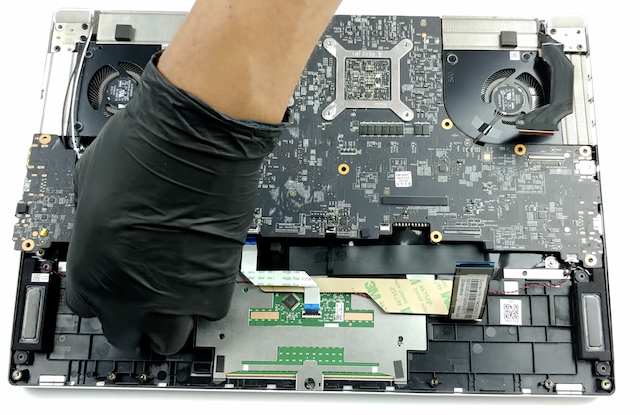
Step 6: Ok, the hard part is over! Now you just need to grab your screwdriver and remove the screws that are attaching the motherboard to the chassis like so. After doing that you're going to gently go ahead and grab onto the hinges of the motherboard to separate it from the chassis.
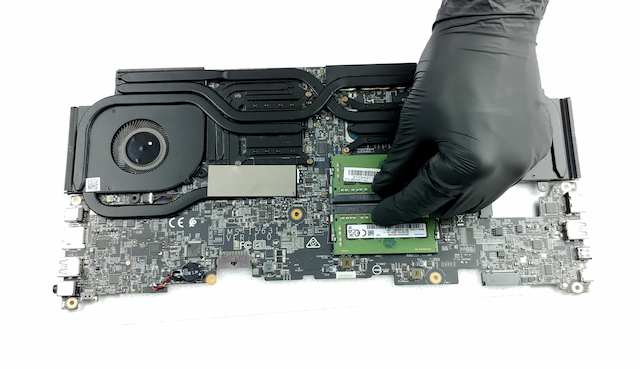
Step 7: Finally, you can flip the motherboard over and you've got access to the RAM slots. Don't worry, all this work will have been worth it once you notice the massive leap in performance you're about to witness. Now here's what the motherboard with the RAM modules looks like:
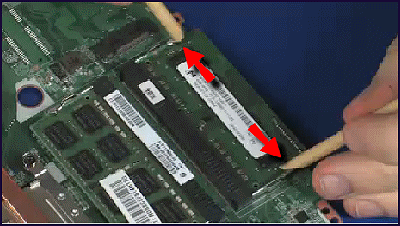
This will release the memory at a 45-degree angle at which point you can retrieve it at that same angle to make sure you don't damage the pins. Here's a gif of what pulling the RAM looks like, in this example, they're using sticks but generally speaking it's something we do with our hands.
Step 9: Now that you've removed the two RAM modules from their corresponding slots you're going to grab the memory modules you've bought and you're going to place them at a 45-degree angle, press inwards, and then push downwards until you hear a "clicking" noise.
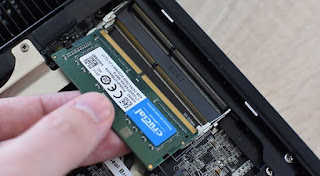
That's the sound of the clasps of the RAM slot clutching to the module. Here's an example image of another laptop to show you how to introduce the memory sticks:
Step 10: Ok, you have successfully upgraded the RAM on the MSI Stealth 15M. Now you're going to need to retrace your steps to connect everything back to where it was. Fortunately for you, we've taken plenty of pictures and you can easily go back.
All you need to do is place the motherboard right side up, re-attach the screws you removed, place the three connectors you detached, attach the wireless card again, insert the NVMe stick you removed early on at a 45-degree angle, and place the battery back where it was connecting it to the motherboard and inserting the screws once more.
And that's all! You can turn your laptop on and you'll be able to quickly see that you've upgraded the memory. Congrats!