We've talked in-depth about the Asus VivoBook 15 F515JA-AH31 in the past. A stellar student notebook that features a great set of overall specs. However, while it's undisputed that the Asus VivoBook 15 F515 is a great laptop lineup, it's also possible that it doesn't feature as much RAM as you would like (some models within this series will feature as little as 4 GB of RAM).
As you know, the RAM or memory of a laptop is what allows you to perform numerous tasks at the same time. The more memory a laptop has, the more tasks it can perform at any given time without freezing or lagging behind because of insufficient memory.
And, while most manufacturers tend to produce mid-range notebooks with 8 GB of RAM, they also allow you to quickly and easily upgrade it if you need more memory. Such is the case with Asus and its F515 series.
Today, we're going to walk you through the process of upgrading the RAM on the Asus VivoBook 15 F515. Don't worry, you'll be in and out in 5 minutes, it's an easy tutorial.
How to Upgrade the RAM/Memory on the Asus VivoBook 15 F515 Series laptops
Before we go ahead and open the laptop up you should definitely have your bases covered and know how much memory this system supports, what type of memory you'll be able to use, and to a more personal extent, how much memory you wish to install.
What Type of RAM does the Asus VivoBook 15 F515 take? How Much RAM Can I Install?
As you might know, there are different types of RAM. Not all laptops take the same type of memory so it's important to purchase a module of RAM that's compatible with your system requirements. In this particular case you're going to need to get your hands on a
DDR4 PC4-25600 3200MHz Non-ECC SODIMM memory module.
This "geek talk" basically means you need a DDR4 memory module with a 3200 MHz clock speed that operated under the SODIMM form factor.
How much memory can I upgrade?
There's an interesting thing about this series of laptops: it only features one available RAM slot - unlike our latest
MSI Stealth 15M RAM upgrade -. It ha
s 4 GB that have already been
soldered onto the motherboard and you've got
one available SODIMM RAM slot which is where you can insert your RAM.
Depending on the model within this series that you've got, this slot may already have a RAM module inserted inside. All you need to do in that case is remove it, we will walk you through it.
The choice is up to you but we generally recommend at least upgrading to a total of 12 GB to get a solid multitasking performance, 20 GB if you really like working with dozens of tabs and several programs open at a time.
Tutorial to Upgrade the Memory on the VivoBook 15 F515 Series
To perform this procedure you're going to need a Philips screwdriver, a
prying tool of some sort, such as a guitar pick, for example, and we would recommend using
anti-static gloves or rubber gloves if you don't have anti-static gloves in hand.
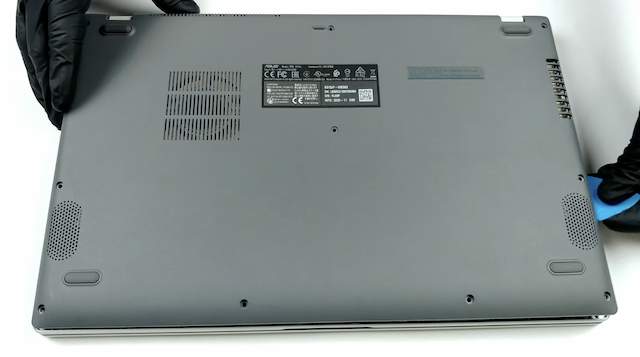
Step 1: Before we place the laptop upside-down make sure that you have turned it off and disconnected it from the power source. Very important that it is actually turned off and not hibernating or in sleep mode.
Once that is out of the way, place the laptop on its back and remove the screws attaching the lower case to the chassis making use of the aforementioned Philips screwdriver.
Now, with the use of a
prying tool -
such as this one -
you're going to insert it on the sides to open the laptop up. Here's what that would look like as you separate the case from the chassis.
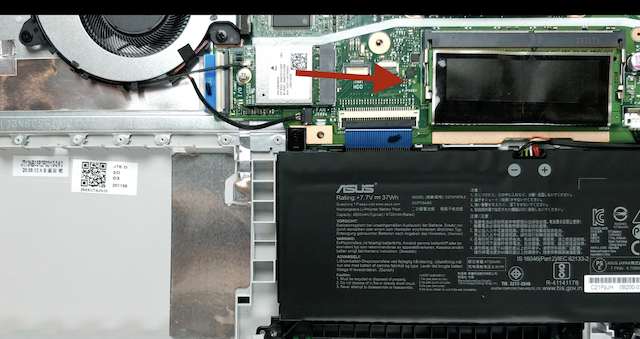
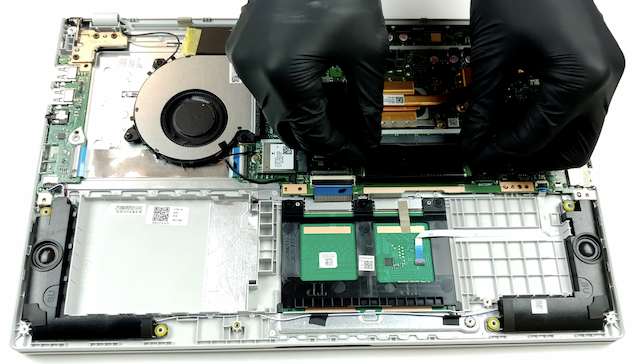
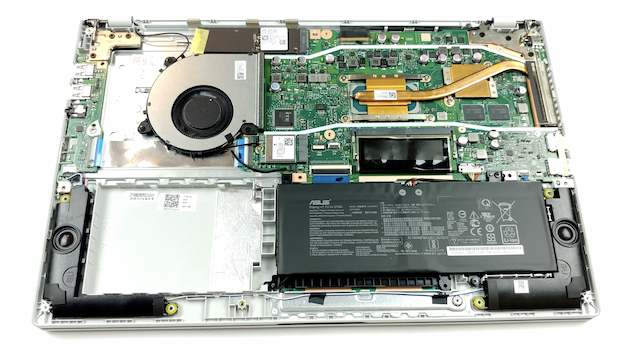
Step 2: Now that you have opened the laptop up you can see the internal components. If you wish to be extra safe you may unplug the battery but it's not strictly necessary for a memory upgrade.
Step 3: As you can see, there's a heat shield located above the memory slot. The memory slot is that black rectangle located atop of the battery.
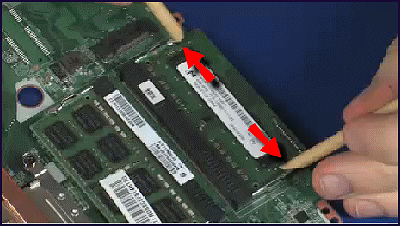
Step 4: If you've got yourself a notebook that already has the SODIMM slot occupied because you've got maybe 8 GB of RAM then what you're going to do is simply remove it and replace it with your new module.
To do that you need to pull outwards on the hinges located on the sides of the memory slot. This will release the RAM at a 45-degree angle and that's how you need to pull it off.
In case you want something a bit more visual here's a gif that shows you how to pull outwards on the hinges. In the gif they are using sticks but this can easily be done with your hands. Also, I hate to state the obvious but this gif is not of this computer and it's just here to illustrate how we remove the RAM module.
Step 5: Now that you have removed the previous memory module (if your laptop had one), you're going to go ahead and insert your new memory into the slot.
To do so simply introduce the RAM at a 45-degree angle making sure that the notch on the RAM slot and the notch on the memory module align. Here's what that would look like for illustrative purposes. Don't worry if you didn't buy RAM from Crucial, all SODIMM 260 pin RAM have the same form factor.
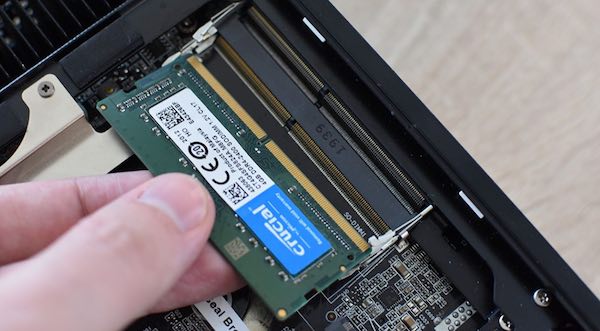
Step 6: Now that you have introduced the RAM at a 45-degree angle making sure it's properly inserted you're going to go ahead and press down on the module firmly but gently. You'll hear a "click sound", that's the sound of the clasps of the RAM slot attaching themselves to your new RAM module.
Step 7: Finally, now you're going to place the bottom case back in its place, making sure to re-connect the battery in case you had previously disconnected it at the beginning of this tutorial. Once that's done, turn the laptop on, and under "Device specifications" you'll be able to see the new amount of RAM you've upgraded to.
Congratulations! Told you it was a very straightforward upgrade and easily one of the best upgrades one can perform on a laptop to have a noticeable increase in performance at a minimal cost. Now enjoy all the possibilities that having more RAM provides!