Memory is a pretty big deal for gaming laptops. Along with the processor and the graphics card, it's what can make the difference between a laptop that offers no lag when gaming and one that has plenty of lag.
However, though this is true, most manufacturers will ship their gaming laptops with the minimum amount of RAM needed for a decent gaming experience, more so when talking about laptops that spent most of their budgets on top-notch graphics and a powerful processor such as the MSI GL65 Leopard 10SFK-062 we will be talking about in today's tutorial.
Fortunately for us, upgrading the RAM on the MSI GL65 Leopard 10SFK-062 is a pretty easy process and one we would seriously recommend to anyone who has purchased or is planning to purchase this laptop. Upgrading the RAM will not only improve multitasking performance but also improve gaming, graphics, video editing, and just the general performance of the laptop.
Without further ado, let's get on with this tutorial on how to upgrade the RAM of the MSI GL65 Leopard 10SFK-062.
MSI GL65 Leopard 10SFK-062 RAM Upgrade Tutorial Step By Step
How much memory does this laptop take? What type of memory does it use?
This notebook packs 16 GB of RAM divided into two 8 GB sticks of memory. Both sticks are removable so you don't have to worry about having memory modules soldered onto the motherboard like we've seen on some mid-range laptops.
The type of memory you're going to need for this laptop is a
DDR4 PC4-21300 2666MHz Non-ECC SODIMM memory module. This basically means it's a 4th generation RAM clocking in at 2666 MHz and uses the standard SODIMM form factor.
The
MSI GL65 Leopard 10SFK-062 will take up to a
maximum of 64 GB of RAM. Depending on your usage you will need to judge how much memory you're going to need.
Two sticks of compatible 32 GB will always be the best bet to make the absolute most of what this gaming laptop has to offer.
However, if you're on a budget, then
consider upgrading to 32 GB with
two 16 GB compatible modules. You'll still notice a substantial improvement in performance and depending on your usage this might be more than enough for you.
Step-by-step RAM Upgrade
As we always mention in these tutorials, the first step is to make sure the laptop is turned off and disconnected from any power source. You could also opt to use rubber or anti-static gloves but that's your call.
As far as opening the laptop is concerned, some laptops are pretty difficult to open without the use of a pry tool but that's your call. This isn't the hardest laptop to open so you could get by with your nails and a credit card.
Step 1: Place the laptop on its back and remove all the screws attaching the bottom case to the laptop. It has quite a few so this step might take a couple of minutes. Once that's done you should proceed to look for a place where you can start prying the laptop open like so:
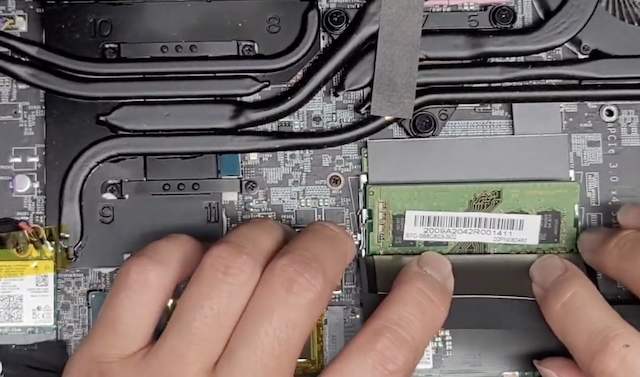
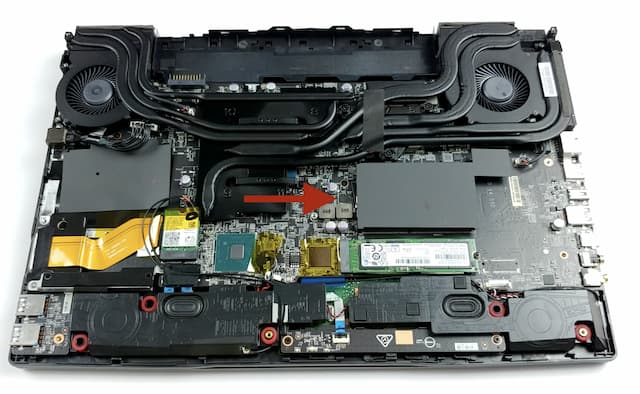
Step 2: Now that the laptop has been opened you will notice both RAM modules located below the black heat shield just above the NVMe SSD unit.
Step 3: The next step is going to be to remove the onboard memory modules located below the heat shield. To do so simply pull outwards on the metallic clasps located on the sides of the RAM slots. This will release the memory module at a 45-degree which is how you should go ahead and remove it.
Step 4: Do the same for both modules. If you check you will see that both modules have a heat shield covering them. Peel it off and remove the module the same as in step 3. Once that's out of the way you can go ahead and insert the memory modules you've bought for the RAM upgrade.
All you need to do now is insert them in such a way that the pins align. You will also notice that there's a notch on your memory module as well as in the memory slot, as long as the notch aligns you're good to go.
Here's an image of what that would look like. Though the image is of another laptop the process is exactly the same so it serves you as a guide to see that you are inserting the memory properly.
Step 5: Once the RAM is inserted into the slot, press down gently but firmly. When you hear a small metallic "Clicking" sound, that means that you have inserted the memory module properly.
Now that the memory modules have been inserted and the RAM has been upgraded you're going to need to place the bottom case back on with the screws you removed in step one.
Turn the laptop on and that's it. You should be able to see the new amount of memory you have installed and whether you went for the 32 GB upgrade or the 64 GB upgrade you're going to notice an enormous difference in performance compared to the 16 GB the laptop came with. Enjoy!