When it comes to gaming there are three needs that need to be met. You need to have a killer processor, a high-end graphics card, and plenty of memory to be able to handle AAA games smoothly.
When buying a gaming laptop you'll generally be able to check off the first two items but RAM is often not a priority with the more affordable gaming laptops. This is also because they know that this is one of the few aspects that the user can opt to upgrade himself later down the line.
Such is the case with the MSI GE76 Raider, a laptop lineup that lands on shelves with numerous configurations but generally not a lot of RAM on any of them. Having said that, it's also very easy to upgrade the RAM on the MSI GE76 Raider and that's exactly what we're going to be covering today in this quick and easy tutorial.
MSI GE76 RAM/Memory Upgrade Step By Step
What Type of Memory Module Does It Support? How Much Memory Can I Upgrade to?
Much like the
MSI GF63 RAM Upgrade we covered recently, this lineup uses the
DDR4 PC4-25600 3200 MHz NON-ECC SO-DIMM memory standard. That means that it uses DDR4 SO-DIMM modules that clock in at 3200 MHz. It's a really fast type of RAM and one that's sure to be noticed when dealing with heavy workloads.
Moving onto the million-dollar question of how much RAM you can Install on the MSI GE76 Raider the answer would be 64 GB. Depending on your configuration we would recommend you upgrade to 32 GB at least.
To perform the upgrade the best practice is to get
two 16 GB compatible modules of RAM. This is recommended to make sure that both modules are identical, something that's necessary if you want to enjoy the benefits of your laptop working with dual-channel RAM.
You've also got the option of
upgrading to 64 GB with
two compatible 32 GB modules. This might be a bit of an overkill unless you're planning to work on seriously RAM-intensive tasks, in which case you should definitely consider the upgrade.
RAM Upgrade Process
Once you've gotten your hands on a compatible module of RAM you're going to go ahead and turn off the MSI GE76 Raider and disconnect any accessories that might be connected to it.
For this upgrade, you're going to need a screwdriver and a prying tool of some sort. Most people will use a guitar pick to pry open a laptop, that's because the prying tool needs to be non-metallic so it can't conduct electricity.
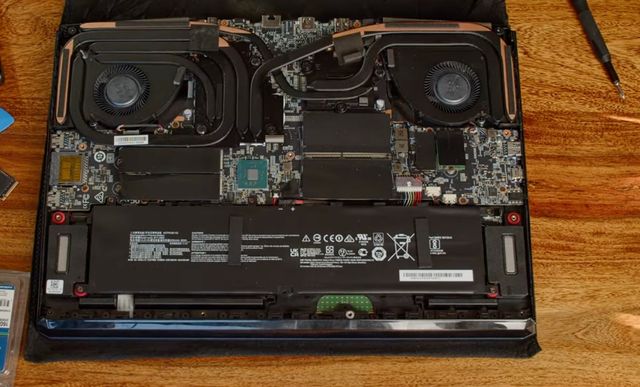
Step 1: With the laptop turned off you're going to place it on its back and remove all the screws attaching the bottom case to the body of the laptop.
Step 2: Once you have removed all of the screws attaching the bottom case you're going to go ahead and make use of the prying tool we mentioned earlier to help you pry open the laptop gently but firmly. After that's done you should remove the bottom case and you'll have access to the laptop's board.
Step 3: Once you have located the RAM slots which are positioned right above the battery, on the right side of the laptop, you're going to go ahead and remove the onboard RAM modules to be able to enjoy the dual-channel RAM that's only available when using two identical RAM modules.
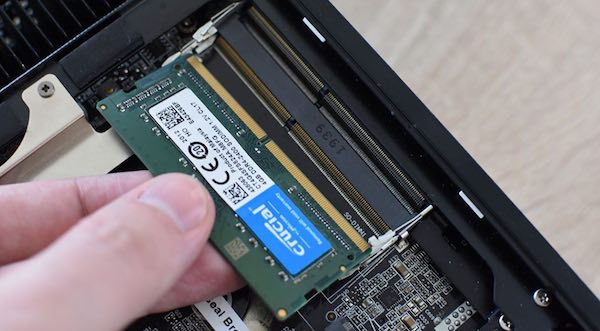
To remove the onboard RAM you're going to pull outwards on the clasps located on the sides of the RAM slot like so:
Step 4: The memory module will be released at a 45-degree angle. At which point you can safely remove it.
Step 5: Once you have removed the onboard RAM you're going to go ahead and insert the memory you've bought for this laptop.
You're going to introduce the RAM modules at a 45-degree angle, making sure that the pins align. If the pins don't align you're not going to be able to insert the RAM on the available slot. Here's an example of how it should go:
Step 6: With the module properly inserted into the slot you're going to gently press down on it. Once you do this you should hear the sound of the metallic clasps clutching to the RAM module. If you've bought two identical modules you need to do the same with both available slots.
Step 7: Now that you have introduced the RAM into the slot you can go ahead and re-attach the bottom case. Turn the MSI GE76 Raider on and head over to "Device Specifications". There, under the line "Installed RAM", you should now be able to see your new amount of memory.
And that's it. You have quickly and swiftly upgraded the RAM on the MSI GE76 Raider. As you can see there isn't really that much to it. Now you can enjoy a speedier and overall more rounded performance. Enjoy!