We've already tackled how to upgrade the memory on the MSI GF63 laptop lineup. However, what if you wanted to upgrade the storage instead. That's what we're going to be covering today. Specifically, we're going to talk about how to increase the storage on an MSI GF63 laptop by including an NVMe SSD storage unit, something that the laptop allows without the need to swap out the onboard storage.
Without further ado, let's get on with the MSI GF63 storage upgrade tutorial. A quick and easy process that shouldn't take you more than 5 minutes to complete.
How To Increase The Storage On The MSI GF63
What Type Of Storage Does This Laptop Accept? How Much Storage Can I Use?
Before one starts disassembling the laptop you must know exactly what type of storage the laptop supports and how much you can use. In most cases, a laptop will only allow you to introduce a SATA drive and swap out the PCIe drive.
However, in some cases, there will be an additional PCIe slot for you to introduce a complementary storage unit. Such is the case with the GF63, which allows users to introduce both a SATA SSD or HDD and a PCIe NVMe M.2 SSD.
If you need to make a choice we would undoubtedly push you toward the PCIe NVMe M.2 storage drive. This type of storage delivers up to 15 times faster read/write speeds than your standard SATA SSD. Specifically, we're talking about speeds that reach a maximum of 7700 MB/s vs the average 550 MB/s you'll get on a SATA SSD.
In any case, today we're going to walk you through how to increase the storage on the GF63 by way of a PCIe NVMe M.2, and on that front, you should know that you can use a drive of up to 4 TB. The amount of storage you get will depend heavily on your needs but we would recommend at least going for a 1 TB compatible unit.
How To Upgrade The Storage On The MSI GF63
Before you do anything you need to make sure that the laptop is turned off and any accessories are disconnected from the device. For this upgrade, you're going to need a screwdriver and a prying tool of some sort to help you open up the laptop. Many people use a guitar pick to open up a laptop, that's definitely one way to go since you need the prying tool to not be metallic, otherwise, it will conduct electricity.
Step 1: Once you've made sure that the laptop is turned off place it on its back and remove all the screws attaching the bottom case to the body of the laptop.

Step 2: When all the screws have been successfully removed you're going to use the prying tool to help you open the laptop up. Start by the upper left corner and work yourself clockwise. As you move along with your prying tool you're going to make sure that the clips pull outwards to remove the lid.
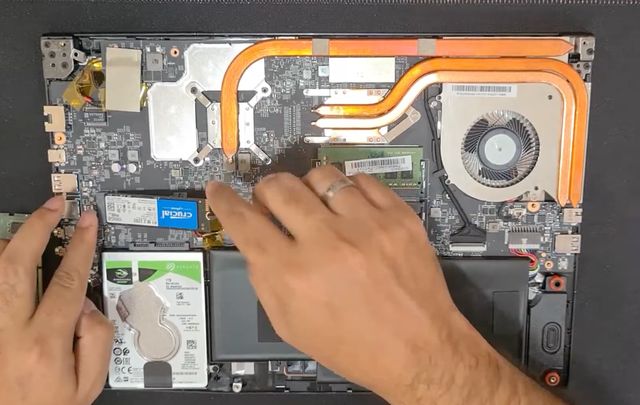
When it's removed you should be able to quickly see the internals and recognize the empty slot available for a PCIe NVMe M.2 drive.

Step 3: As a safety measure we would recommend that you disconnect the battery before introducing the drive. To do so simply pull on the connected pins shown on the image below.

Step 4: Now that you have disconnected the battery you may go ahead and introduce your M.2 PCIe NVMe drive on a 45-degree angle like so:
Step 5: Once you have introduced the drive into the slot of the MSI GF63 then all that's left is for you to screw it in its place through the little notch located at the top of the drive. When that's done you can reconnect the battery and re-attach the bottom case.

And that's it! You have successfully installed a new drive on your MSI GF63. Now just sit back and enjoy.