We've already talked in-depth about the process of upgrading the RAM on the Acer Aspire 5 A515-45-R74Z. Today things are about to get a bit more complicated as we set out to upgrade the storage on the Acer Aspire 5 A515-45-R74Z by installing another SSD unit.
We've talked multiple times about the Acer Aspire 5 A515-45-R74Z, it's a brilliant laptop that boasts a powerful AMD Ryzen 5 5500U Hexa-Core processor, 8 GB of RAM, and 256 GB of NVMe PCIe SSD storage.
It's a great laptop and for most people, these specs are more than enough. However, for power users, both storage and RAM may fall short and that's where this tutorial comes in. Today we're going to take you through the whole process of upgrading the storage on this laptop so that you can store all your multimedia library without having to deal with the 256 GB restriction.
Be warned, it's not as straightforward as other upgrades we've performed in the past simply because of the layout that Acer has given this notebook but with a little bit of patience you can easily get it done. Let's get on with it!
How To Upgrade The Storage on the Acer Aspire 5 A515-45-R74Z
The first thing you're going to want to do is get yourself a compatible storage unit. Specifically, you're going to need to get your hands on a
2.5-inch SATA III SSD unit. We would recommend getting this
Samsung Evo SSD, it
comes in different capacities and has worked pretty well. However, if you have another preference you can check out
compatible SSD drives here.
For this upgrade you're going to need a
screwdriver, ideally a
magnetic screwdriver for the really small screws that come with the SSD to attach to the laptop's board. You'll also need a
prying tool of some sort. Most people will use a guitar pick but that's your call -
this kit works well for most -. Just make sure it's nothing metallic since we are dealing with electronics over here.
Once that's out of the way and you've got your SSD you're going to go ahead and turn the laptop off, disconnect it from the power source, and remove all peripherals that might be connected to the laptop.
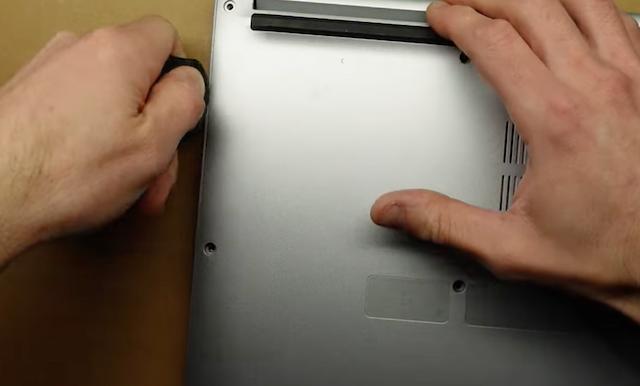
Step 1: Place the laptop on its back and remove all the screws attaching the bottom lid to the rest of the laptop. Fortunately for you, all the screws are identical in height so you don't need to keep a tally as to which screw goes where when you eventually re-attach the bottom case.
Step 2: With the help of your prying tool, open up the laptop.
Step 3: Now that the laptop is open the first thing you're going to want to do is disconnect the battery. To do so simply pull out the plug that's connecting the battery to the board of the laptop.
 |
| Disconnect the battery by pulling on these cables |
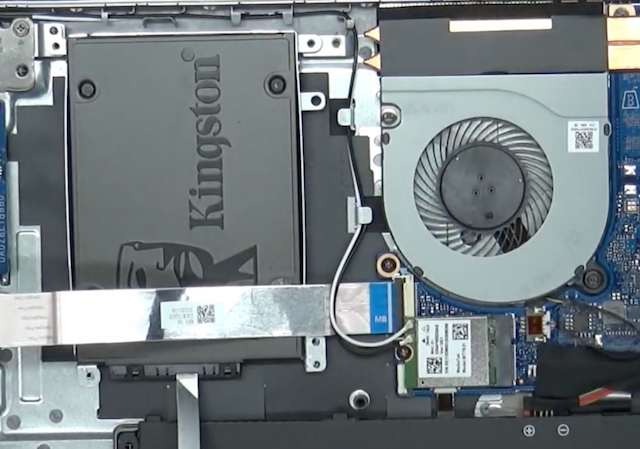
Step 4: Now that that's done comes the complicated part. Unfortunately, Acer has not made this a very easy upgrade. The next step in your quest is going to be to remove the WiFi card from its place.
This is something we have to do because the WiFi card is covering the connector that you need to connect the SSD to the motherboard. Simply grab your screwdriver and remove the WiFi card and place it on the side while you keep doing the upgrade.
Step 5: Now that you've removed the WiFi card from blocking the port you're also going to need to remove the ribbon cable that's located exactly where you're going to place your SSD (thank you Acer for making this soooo easy). To take it out all you need to do is pull upwards on the connector and that should allow you to release the ribbon cable so that you can place your SSD there.
Step 6: Now that everything is clear and ready to go, grab your SSD and connect it to the SATA connector. That's the cable that came with your drive along with the screws.
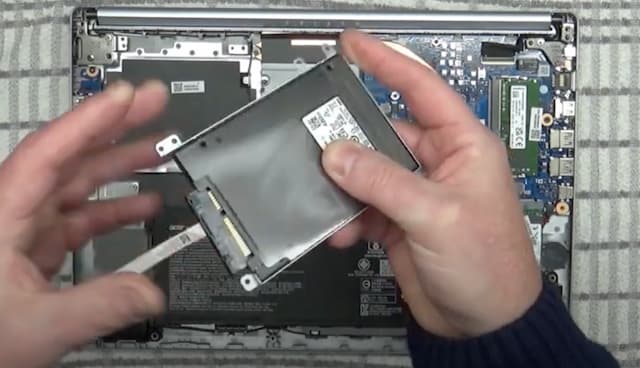 |
| You need to connect the SATA connector to the SSD drive |
Step 7: Now that the SATA connector is connected to the SSD drive you can mount the SSD drive in its place. Grab your magnetic screwdriver and mount the Drive to the motherboard of the Acer Aspire 5 A515-45-R74Z like so:
Step 8: You can
re-attach the ribbon cable you removed a few steps before now that you've got the SSD in place. However,
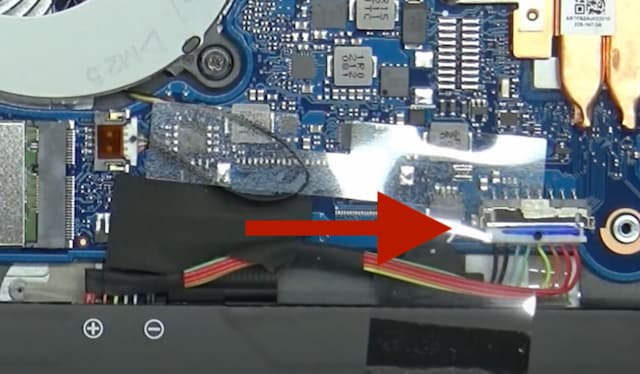
before you go ahead and re-attach the WiFi card in its place you're going to grab the other end of the
SATA connector and you're going to place it in the connecting port.
To do this simply pull upwards on the plastic white "protective" cover and that will allow you to introduce the SATA connector in its place. Insert the cable and close the "cover" once again.
Step 9: Place the WiFi card back on top by screwing it back in place. This is what that should look like:
Step 10: Finally! You're done. Congratulations! Simply connect the battery you disconnected at the beginning of this tutorial, re-attach the bottom case and that's it.
You have successfully upgraded the storage on the Acer Aspire 5 A515-45-R74Z by adding a 2.5-inch SSD SATA III unit.
The next steps are going to be mounting the drive and creating volumes within Windows but that's a story for another day for us. For now, we're happy we got you through the whole intricate process of doing this upgrade.


