We've talked in great detail about the Dell Inspiron 16 5635 (i5635-A005SLV-PUS), an impressive 16-inch laptop with a killer display, powerful AMD Ryzen 7 7730U processor, 1 TB of storage, and 16 GB of RAM. It's a great laptop and one that we recommend every day for students and professionals who want to get a solid laptop with a good price-to-value proposition.
However, everything can always be improved, and while we're fairly happy with the 1 TB storage, you might need a bit more storage capacity than us. It's with that in mind that today we'll walk you through the process of upgrading the storage on the Dell Inspiron 16 5635 (i5635-A005SLV-PUS).
Specifically, we're going to be introducing a 2280 NVMe PCIe storage module. It's not a complicated upgrade, you should be in and out in about 10 minutes tops. So roll up your sleeves, get your screwdriver, and let's do this!
How To Upgrade The Storage On The Dell Inspiron 16 5635 (i5635-A005SLV-PUS)
Before you do anything, you need to know exactly what kind of storage module you're going to be inserting. In this case, since the laptop uses a PCIe gen 3 SSD we would recommend using the same generation but with a 2280 form factor instead of a 2230 form factor.
They did this because it's more power efficient and the truth is that, for most of us, the difference between a Gen 3 and a Gen 4 is negligible in terms of performance but noticeable in terms of battery life drainage.
This will depend on your needs so it's a pretty personal decision and the financial cost of a 1 TB upgrade vs a 3 TB upgrade is definitely something to consider (it costs twice as much to get a 4 TB drive typically).
Step-By-Step Upgrade For The Dell Inspiron 16 5635
Before you start the upgrade you're going to need to have a screwdriver on hand. We would also recommend you have a prying tool to help you open up the laptop. It's important that you don't use anything metallic here since you could damage the internals.
Perhaps you've got a guitar pick which is the most commonly used item to pry open a laptop. If that's not the case we would recommend getting a kit to pry open the laptop. They're very cheap and it gives you an assortment of options.
Before doing anything we should stress that the laptop has to be turned off. That means completely turned off. Not in sleep mode or in hibernation. It should also be disconnected from any power source.
Additionally, since you're swapping out the storage that contains your operating system you should back up your data.
You should also have a Windows installer on a USB drive. You could probably do this on your own or you could get yourself a Windows Installer USB.
Step 1: Place the laptop on its back and remove all the screws that are attaching the bottom case of the notebook.
Step 2: Now is where the prying tool will come in handy. Use it to separate the bottom case from the rest of the laptop gently but firmly.
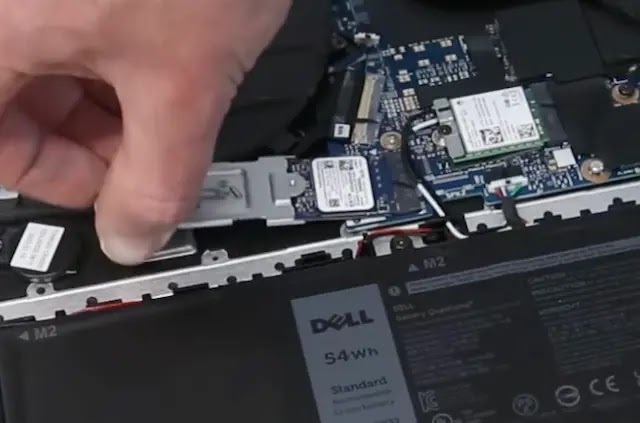
Step 3: Once you've removed the bottom lid you're going to go ahead and disconnect the battery connector. For RAM upgrades you can skip this step but for storage upgrades it's necessary.
The battery is the massive black rectangle located at the bottom of your laptop. Remove the connectors that are attaching it to the motherboard.
Step 4: Once the battery is disconnected you can move on with the upgrade. You'll notice a small square connected to the storage PCIe port. That's the 2230 NVMe storage unit.
We're going to remove it in this tutorial and replace it with an NVMe 2280 SSD. To do this you'll need to remove the screw attaching it to the board and then wiggle a little bit to remove it.
This will "release" the storage unit at a 45-degree angle. That's when you wiggle it out of the connector gently.
Step 5: Now you need to grab the NVMe drive you bought to upgrade the Dell Inspiron 16 5635 and you're going to slide it at a 45-degree angle making sure that the pins align properly.
When the golden pins have "disappeared" into the connector, that means you've done a good job and you can go ahead and press down to screw the drive in its place.
With that step done, you've already upgraded the storage. Now you need to reconnect the battery you disconnected at the beginning of this upgrade, place the bottom lid back in its place, and boot up the bad boy.
Remember, as with any storage upgrade that implies the removal of the main drive, you're going to need to use a Windows installer to reload the system and have your data backed up so that you can quickly and easily recover it. Enjoy the extra storage space!


