The HP 15-dy2024nr is a versatile laptop built to meet the needs of the modern user. It showcases a bright 15.6-inch Full HD IPS micro-edge display, perfect for a wide range of multimedia content. At its heart, an 11th Generation Intel Core i5-1135G7 processor delivers the power and speed required for varied tasks. The laptop comes pre-installed with an 8GB DDR4 RAM for efficient multitasking. Moreover, it houses a 256GB PCIe NVMe M.2 SSD, ensuring fast application launches and sufficient space for storing files.
However, while 256 GB can be enough for some users, for many it's not enough. Additionally, boosting your laptop's storage capacity can significantly enhance its versatility and utility.
The HP 15-dy2024nr, though already equipped with a solid-state drive for quick boot-up times and efficient data retrieval, can benefit immensely from a storage upgrade. As well as a RAM upgrade which we've already covered in this tutorial.
A larger storage drive provides the space needed to house more applications, keep larger files, or maintain an extensive media library. It also means less reliance on external storage devices, which can be a significant convenience factor for many users.
Whether you're a digital artist with a large portfolio, a gamer with a library of high-definition games, or a professional storing numerous large files, upgrading your laptop's storage can make a world of difference. In this tutorial, we will guide you on how to perform this crucial upgrade for your HP 15-dy2024nr.
How to upgrade the storage on the HP 15-dy2024nr step-by-step
Before doing anything you'll need to know exactly what kind of storage unit is compatible with this laptop. Specifically, in the case of the HP 15-dy2024nr you're going to need an
M.2 NVMe storage unit. This is the fastest type of storage unit.
Since the laptop already comes with 256 GB we're going to recommend you at least
upgrade to a 500 GB module or a
1 TB module but that's going to be a personal decision contingent on your needs and your budget.
Before performing this type of upgrade you definitely need to
backup all your data since this is an NVMe replacement process because the laptop only has
only one NVMe slot.
Lastly, for this tutorial, you will need to get your hands on a screwdriver and a prying tool to help you pry open the laptop.
HP 15-dy2024nr NVMe/Storage Upgrade Step-by-Step Tutorial
Step 1: Turn your HP 15-dy2024nr off and disconnect it from its power source. You'll also want to disconnect any peripherals that might be connected to the laptop such as a mouse or a webcam. Don't place the laptop in hibernation mode, turn it off completely.
Once you've done that, place that laptop on its back and gently remove the rubber strips that are blocking your access to 6 of the 8 screws attaching the bottom case of the laptop to the rest of it like so:
Step 2: Now remove the screws attaching the bottom case.
Step 3: Once you have removed the screws use the prying tool to help you open up the laptop. Gently but firmly apply the prying tool throughout the sides of the laptop case to help you separate the bottom case like so:
Step 4: Now we're into the nitty gritty. You're inside the laptop. You'll notice easily the battery, the RAM slots on the side, and the NVMe module.
Step 5: When performing a storage upgrade, such as the one we will be performing, you need to disconnect the battery.
In this particular case, the battery is screwed to the motherboard and slid into its connector. Typically you would just disconnect it from the motherboard but since here you can't do that you need to grab your screwdriver and remove all the screws attaching the battery to the body of the laptop.
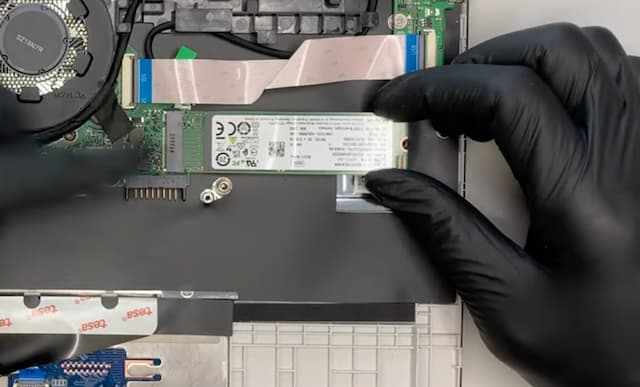
Step 6: Now that that's done you can remove the battery. Once the battery is removed, you will notice that on top of it you have the NVMe module that's connected to the NVMe slot. The NVMe module is attached to the motherboard on one hand through the connector at one end and on the other end it's screwed to the board.
With your screwdriver, you're going to have to remove the screw that's attaching the current module to the board.
Step 7: The previous action will allow you to remove the drive. Simply and gently pull it outwards from the connector.
Step 8: Grab the drive you've bought for the upgrade and introduce it where the previous drive was housed. You're going to need to grab the screw you took out from the previous drive to lock the new drive into place once you have introduced it in the slot.
And that's it! You can now go ahead and re-attach the battery you removed for this tutorial and place the bottom case back in its place. Boot up the laptop and with the help of your USB Windows drive you can re-launch the system. Assuming you did an information backup as we recommended (though some people also like to wipe the slate clean so to speak) you can easily recover the data and have the exact same laptop but with a whole lot more storage.
We hope you enjoy the upgrade!


