 |
The Asus TUF Gaming F17 FX706LI-ES53 is a great gaming laptop. Competitively priced, with a solid processor and high-end graphics card, this is the perfect go-to laptop for powerusers looking to game, edit videos, edit pictures, and the likes. However, it does have a couple of shortcomings, particularly the RAM and Storage capacity. |
We've already shared a tutorial on how to upgrade the RAM on the Asus TUF Gaming F17 FX706LI-ES53 step-by-step, and today we're going to explain to you guys how to do another important upgrade: we're going to explain how to upgrade the storage on the Asus TUF Gaming F17 FX706LI-ES53.
Without further ado, let's get on with this guide!
Asus TUF Gaming F17 FX706LI-ES53 Storage Upgrade Options and Tutorial
What type of storage upgrades does it take?
First off, we should explain that the FX706LI-ES53 features two possibilities to upgrade the storage. On the one hand, you've got your standard 2.5-inch SATA bay where you can place a 2.5-inch SATA SSD of any capacity, or even a mechanical HDD - though we seriously recommend you don't go for an HDD as they're substantially slower -.
On the other hand, you've also got a PCIe NVMe SSD Slot for an SSD unit with the M.2 2280 form factor.
If you're choosing amongst the two storage upgrades we would seriously encourage you to go with the PCIe NVMe SSD unit as the read/write speeds are up to 6 times faster than the SATA SSD unit. But you could also upgrade both storage solutions as many people opt to do.
In any case, for the PCIe slot we would recommend a unit such as the Samsung EVO Plus 970 with 1 TB of storage, as it has an excellent performance on gaming laptops such as this one. Finally, if you're also going to go ahead and upgrade the RAM and you don't need a to check out our tutorial linked above you can just get a DDR4 3200 MHz unit with 260 pins. We recommend getting at least a couple of 8 GB sticks.
How to Upgrade the Storage on the Asus FX706LI-ES53
I assume you have a Philips screwdriver, and you should also have a pry of some sorts to open up the laptop.
Step 1: First thing you want to do is shut the laptop off. You would be surprised by the number of people who omit this step and get to work with the laptop in hibernation mode. Don't be one of them. Now flip the laptop upside down and remove the 11 screws on the lower casing. After you've removed the screws use your pry to open up the laptop gently yet firmly like so:

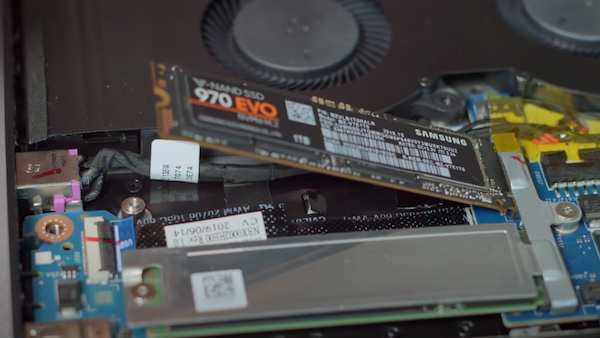
Step 2: Now that you've removed the case you should be able to see both the 2.5-inch SSD SATA bay located on the lower-right side of the laptop, and just above it you can see the slot for the PCIe NVMe SSD m.2 unit. As a precautionary measure, we would recommend you disconnect the battery. This isn't 100% necessary for a storage upgrade but it can't hurt.
|
| The arrow is pointing at the available PCIe NVMe slot, below is the 2.5-inch bay |
Step 4: Once the PCIe NVMe upgrade has been done, if you want to upgrade the SATA bay all you need to do is unscrew the bay, insert the storage unit inside the bay, screw it together with the screws that come with the laptop, and attach the SATA connector (that also comes with the laptop). Again, this image isn't of this laptop, it's just for illustrative purposes.

The SATA connector looks like this, and you connect it to the storage unit:
 |

Finally, your final configuration with the SATA SSD unit should look like this (actual image of the upgraded laptop without the PCIe NVMe upgrade):

And that's it. You can connect the battery if you've disconnected it. Place the lid back on, screw the lower cover to the laptop and turn it on. You should now go ahead and create volumes and partitions to use your new storage but you should be able to see it.
On the off-chance that you don't see your SATA storage unit then there's the possibility that you didn't connect it properly to the motherboard and should do it again. The cable should go all the way to the end to be inserted correctly.