We've already talked in-depth about the Asus VivoBook 15 F515JA-AH31. And just a couple of days back we covered how to go along and upgrade the RAM on the Asus VivoBook 15 F515 series.
Today, we're going to go ahead and tackle head-on how to install more RAM on the Asus VivoBook 15 F515JA-AH31, one of the most popular student laptops of the past year. A quick and easy tutorial that will have you in and out in under 5 minutes.
For this tutorial, you're going to need a Philips screwdriver to remove the 11 screws attaching the bottom case to the chassis as well as a prying tool of some sort. You would also do well to use either rubber gloves or - even better - anti-static gloves, which can double as normal gloves as well.
How to Upgrade the RAM/Memory on the Asus VivoBook 15 F515JA-AH31
Before you start disassembling your laptop you need to know what type of RAM you can use on this notebook since not every notebook takes the same type of RAM. You need to know the generation, clock speed, and form factor. Otherwise, you run the risk of buying a RAM module that won't work on the VivoBook 15.
What type of RAM does the Asus F515JA-AH31 use? How much RAM can I Install?
This notebook works with DDR4 PC4-25600 3200MHz Non-ECC SODIMM memory modules. Basically, this means that it takes 4th generation RAM with a 3200 MHz clock-speed and a SODIMM form factor.
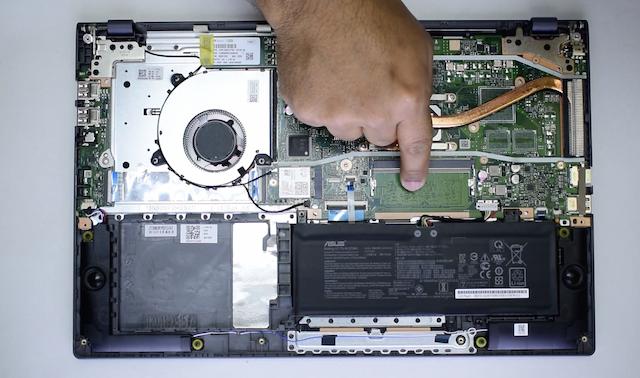
As far as how much RAM you can install. This laptop features 4 GB that have already been soldered onto the motherboard. However, it also features an empty RAM slot located just above the battery. This particular RAM slot can support a maximum of 16 GB worth of compatible RAM, bringing the total RAM on the system to 20 GB.
You could also opt to insert 8 GB of compatible RAM or a 4 GB module. Depending on your usage we would recommend at the very least upgrading to 8 GB of RAM with another 4 GB module to be able to do some decent multitasking without fear of the laptop freezing up on you.
On the other hand, if you're a pretty intensive multitasker who is prone to having dozens of tabs open at a time then going all the way up to 12 GB with another 8 GB module is a pretty safe bet.
Finally, 20 GB is the best option but realistically speaking it's not an amount that most people would need. More so considering that this laptop doesn't feature dedicated graphics or a super-powerful processor that would allow for some serious graphics work which would take full advantage of the 20 GB of RAM.
Step-by-step RAM Upgrade on the Asus VivoBook 15 F515JA-AH31
Step 1: Before you do anything on your Asus notebook make sure that it is turned off and disconnected from the power supply. You want to make sure that it's not hibernating to avoid having to deal with any residual electricity in the system - that's where the rubber gloves come in handy -.
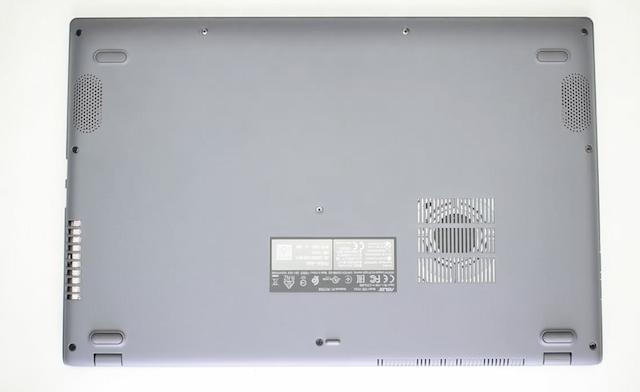
Now that you've made sure of that you can place the laptop on its back and remove all eleven screws attaching the bottom case to the chassis.
Once the screws have been removed you are going to go ahead and grab a prying tool to separate the bottom case from the chassis of the laptop. Most people will use a guitar pick but if you're in a pinch you could even use a credit card to open up the case. Here's an image of how we did that with a darker model of this same notebook.

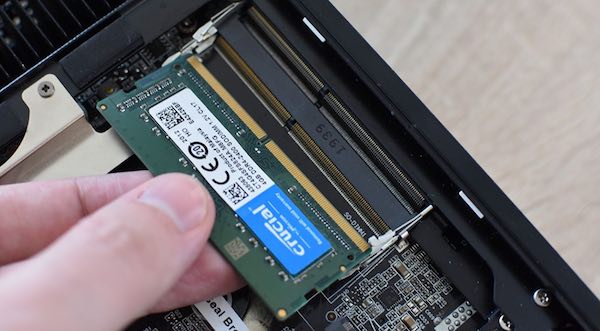
Step 3: Now that you have opened up the Asus VivoBook 15 F515JA-AH31 you're going to go ahead and insert the RAM module you've bought in the available RAM slot.
To do so you're going to introduce the module at a 45-degree angle, making sure that the notch on the RAM slot and the notch on the module align. Here's an image of what that would look like:
Insert the RAM module and once it has been properly introduced with the notches aligned you're going to go ahead and press down on the RAM module.
When you do that you're going to hear a "clicking sound". That's going to be the sound of the clutches on the sides of the slot grabbing onto the new RAM module you've inserted.
Step 4: Finally, you're going to place the bottom case back in its place making use of the eleven screws you removed previously on step one and you're going to turn the laptop on.
Depending on the configuration of the system you could get a message that shows you that you've changed the amount of RAM or you could have to search for it yourself under "Device Specifications" where the new amount of RAM will be reflected.
It bears mentioning that when you introduce a new RAM module and turn the laptop on for the first time after that it may take a bit longer than usual to boot up. That is because the BIOS is scanning the new RAM module and so it can take a bit longer. However, this only happens the first time you boot up the laptop after upgrading the memory, not every time.
Now you can sit back and enjoy the endless possibilities you've opened up for yourself by doing this easy and simple upgrade. Relax and don't stress if you've got one too many tabs open on chrome, have Spotify and Zoom run at the same time, and even do some light picture editing if you've gone with the 12 GB memory upgrade with an 8 GB module.
This is, without a doubt, one of the cheapest and most effective ways to breathe new life into a laptop and expand on its possibilities. Enjoy!