We've talked quite a bit over the past few months about RAM upgrades. That's because this is one of the easiest and most affordable ways to increase our laptop's overall performance. Over the last few years we've witnessed how most manufacturers will ship their mid-range laptops with a standard 8 GB of RAM. That's good for an average user but for more RAM-intensive users who like to work on multiple things at a time it's a bit limiting. The Acer Aspire 5 A515-56-50RS is not an exception to this rule.
However, while it's true that most manufacturers will cap the memory at 8 GB for mid-range models. They do allow you to upgrade it on your own by leaving one or more slots of RAM open for upgrades.
The A515-56-50RS is one of those models and today we're going to walk you through the process of upgrading the RAM on the Acer Aspire 5 A515-56-50RS. A fairly simple process that you should be able to perform in under five minutes.
Acer Aspire 5 A515-56-50RS RAM/Memory Upgrade Tutorial
Before we get to work on installing more memory we need to know what type of memory is compatible with this laptop and exactly how much we can install. Some laptops will allow users to install 64 GB of RAM on two 32 GB slots - typically high end devices -, whilst others will present different configurations in terms of the amount of RAM, speed, type and so forth.
What Type of RAM does the Acer Aspire 5 A515-56-50RS use? How much can I Install?
Much like our recent Acer Aspire 5 Slim A515-54-59W2 RAM upgrade, this Aspire laptop only features one available memory slot, with 4 GB already soldered onto the mainboard and 4 GB on the SODIMM slot. In practical terms this means that you can swap the SODIMM module and insert a 16 GB compatible memory module for a total of 20 GB of RAM.
You could also opt to swap the 4 GB module for an 8 GB module of compatible RAM, leaving you with 12 GB worth of memory. The choice is ultimately yours. However, we would generally recommend going for the 20 GB upgrade just because that ensures you that your laptop will be able to handle itself well for years to come.
Finally, when it comes to the type of module of RAM. You need to get yourself a DDR4 PC4-25600 3200MHz Non-ECC SODIMM. That's a DDR4 module of memory that clocks in at 3200 MHz and comes in the SODIMM form factor.
Step-by-step Tutorial on Upgrading the Acer Aspire 5 A515-56-50RS RAM

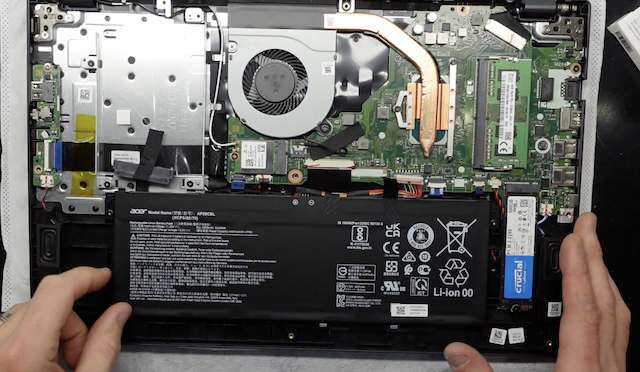
Step 2: Once you have finally finished opening up the laptop you should be able to see the internals which should look like this. You'll notice either that there's an empty RAM slot or an occupied RAM slot with 4 GB above the battery, that's going to depend on the configuration.
Step 3: As an added safety measure you could disconnect the battery. It's not strictly necessary when performing memory upgrades but it can't hurt.

Step 4: Now that you have disconnected the battery you're going to remove the onboard RAM if your slot is occupied. If not then ignore this step. To remove the RAM module all you're going to do is pull outwards on the clasps located on the sides of the RAM slot and that will release the module at a 45-degree angle.
Step 5: Now you're going to go ahead and insert the RAM module you bought into the slot. You're going to insert it at a 45-degree angle, making sure that the notch on the RAM module and the notch on the slot align. You literally won't be able to insert the RAM if the notches don't allign so if you managed to insert it then you've placed it correctly. Here's what that should look like:

If you're not sure that you're inserting it properly here's an illustrative image of what the alignment of the notches looks like:

Step 6: Once the module has been inserted you're going to press down on the memory module gently but firmly. At this point you'll hear the sound of the metallic clasps clutching to the memory. It should sound like a "Click".

And that's it! Now you can go ahead and reconnect the battery you disconnected on step two as a safety measure, re-attach the bottom case to the laptop and turn it on. You might notice it takes a bit more to load than normal but that's pretty standard since the BIOS is integrating the new module.
To confirm that the upgrade went as planned you can head over to "Device specifications" where under "Installed RAM" you should be able to see the new amount of memory on your Acer Aspire 5 A515-56-50RS. Congratulations! Enjoy all the benefits that having more memory will give you in terms of productivity.