When it comes down to mid-range laptops, many of you might have noticed that most of them offer 8 GB of RAM almost by default. It's extremely rare to find a mid-range laptop that offers more memory. That's because for most average users 8 GB is enough and the manufacturers generally give the user the option to easily upgrade the RAM if that's not the case.
If you're an avid multitasker who works with numerous programs at a time then 8 GB isn't going to cut it. That's the amount of RAM that the Acer Aspire 5 A515-54-51DJ comes with. However, today we're going to walk you through this easy tutorial on how to upgrade the RAM on the Acer Aspire 5 A515-54-51DJ. A pretty simple procedure that you should be able to do in roughly five minutes of your time but will give you a laptop that performs far better than the 8 GB it comes with.
How To Upgrade the RAM/Memory on the Acer Aspire 5 Slim A515-54-51DJ
Before we begin, we must know exactly what type of memory this laptop uses and how much you can install. You can't just buy any RAM module and hope for the best since not all laptops use the same clock speed, RAM generation, or even the same format.
What type of RAM does the Acer Aspire 5 Slim A515-54-51DJ use? How much RAM Can I Install?
We should point out that
this laptop doesn't offer two available RAM slots like many other models. It only offers
one available slot to introduce a memory module. That's because, much like the
Acer Aspire 5 Slim A515-54-59W2 RAM upgrade we saw a few weeks ago, it already has
4 GB of RAM soldered onto the motherboard, leaving a single slot to upgrade.
Said slot can take a maximum of
16 GB of compatible RAM once you've swapped out the 4 GB module that's taking its place - this will vary depending on the configuration you encounter -. This means that you can upgrade to a maximum of
20 GB of RAM. However, you also have the option of inserting an
8 GB module, increasing your total memory to
12 GB.
The choice is yours. However, we generally recommend upgrading towards the maximum allowed amount of RAM in these cases because you will be also future-proofing your laptop. This isn't necessarily the case on laptops that take up to 64 GB where we don't recommend upgrading to 64 GB since you wouldn't necessarily notice the difference unless you're doing some serious 8K video editing and the likes.
Step-by-step tutorial to upgrade the RAM on the Acer Aspire 5 Slim A515-54-51DJ
For this upgrade you're going to need to get your hands on a screwdriver, a prying tool and, if you want to take additional security measures you could use rubber gloves while performing the upgrade. However, this isn't strictly necessary.
Having said that, what is totally necessary is that the laptop be turned off and disconnected from the power source. This is very important.
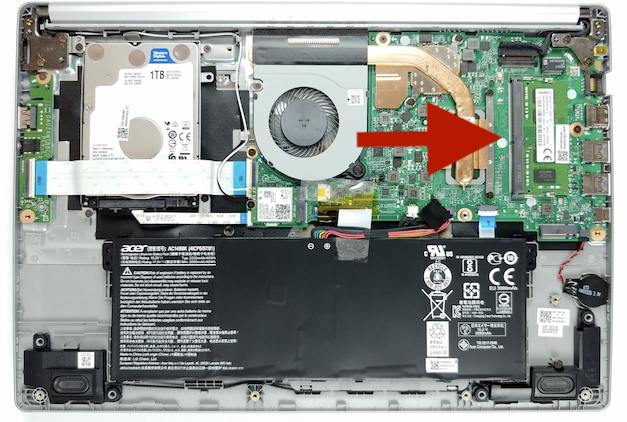
Step 1: The first thing you're going to do is remove the bottom case. To do that simply place the laptop on its back with the hinge facing you and remove all the screws located at the bottom.
Once you have removed the screws that are attaching the bottom case you should make use of a prying tool to help you open up the laptop by separating the chassis from the bottom case. Many people use a guitar pick but you could also use a credit card. Just make sure that it's not metallic. Then slowly release all the clips as you open up the laptop.
Step 2: Once that's out of the way you will be able to quickly see the RAM slot we were talking about earlier. You will notice that there's a RAM module on the slot. You're going to need to remove it. The other 4 GB module is soldered onto the motherboard and isn't visible.
We should point out that whilst the most likely scenario is the one of the Acer Aspire 5 A515-54-51DJ we're showing you in the image below, some users have said that they've seen an empty slot - meaning that the 8 GB are soldered instead of just 4 -. Though this isn't common it's possible depending on manufacturing since Acer will do whatever makes more sense at a given time. In any case it doesn't really change anything.
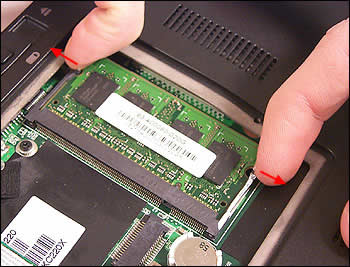
Step 3: Now that you're ready for the upgrade you're going to need to
remove the onboard RAM. To do this simply pull outwards on the metallic clasps located on the sides of the memory slot. Here's an
illustrative image of how you would go about that. When you do that the RAM will be released at a 45-degree angle, at which point it's just a matter of pulling it out.
Step 5: When the module has been removed you're going to introduce the module you bought for the upgrade. Here it's simply an issue of doing the reverse of what you did on the previous step. Basically, the only thing you need to know here is that you need to introduce the memory at a 45-degree angle as if you were landing a plane and make sure that the pins, as well as the notches, align. Again, here's an illustrative image of what that would look like.
Step 6: Finally, when the memory has been inserted onto the module simply press down. You will hear a sound that's made by the metallic clasps clutching to the module. That means that you have correctly inserted the memory module.
Once that's done simply grab the screws and re-attach the bottom case to the rest of the laptop. You can then proceed to turn it on. Don't worry if it takes a bit longer than usual to boot up, that's perfectly normal and standard since the BIOS is scanning the new module and "integrating it" to the system.
You should be able to see a message once you've booted up that your memory has changed. However, in the event that this doesn't happen, you can quickly and easily confirm it by heading over to device specifications and in the line that reads "Installed RAM" you should see the updated amount of memory on your device.
And that's it! Told you it wouldn't take much more than five minutes. It's a quick and easy upgrade that offers a lot of value in terms of the performance you're going to be able to get out of the Acer Aspire 5 A515-54-51DJ moving forward. Enjoy!